
*Thank you for purchasing our product.
To fully utilize the performance of this product, please read this manual carefully and use it correctly and safely.
All our products have undergone rigorous inspections before leaving the factory. Please ensure that the product packaging is undamaged before use.
If the product is damaged or malfunctions, please contact our after-sales personnel promptly.
 Precautions:
■ Operating Environment:
- Do not use this product in places with strong vibrations or impacts, as it may affect the precision components, leading to performance degradation or malfunctions.
- Do not use or store this product in direct sunlight, high temperatures, extremely cold conditions, humid environments, or dusty areas.
- Please use within the specified temperature and humidity range.
- Do not subject the product to vibration or impact while writing data or during communication or turn off the power. Data loss may result in product malfunctions.
■ Installation:
- Do not install the product near corrosive chemicals or in places where corrosive gases are generated.
- Do not install the product in areas with low-melting substances or flammable materials.
- Before connecting or disconnecting modules and wires, be sure to turn off the power. Installing or removing modules and wires with the power on may cause damage.
- Do not tighten connectors by pulling or bending the wires. Doing so may damage the connectors.
■ Others:
- Before cleaning, please turn off the power of this product.
- Clean with a soft dry cloth. Wiping with alcohol, disinfectants, cleaning agents, glass cleaners, or similar substances may cause malfunctions.
- When transferring or disposing of this product, please delete all data. If data remains, there is a risk of malicious reading and leakage by third parties.
- If you encounter any issues with this product, please stop using it immediately, turn off the power, and contact us.
Declaration:
Due to product improvements or other reasons, the products and specifications described in this document are subject to change without prior notice.
Unauthorized copying or modification of any part or all of this document is prohibited.
Every effort has been made to ensure the accuracy of this document. However, if you find any unclear or incorrect information, please contact us.
All rights of interpretation belong to FaceSec.
1. Quick start
1.1 Installation conditions
Precautions
1、 The installation height of the device (the height of the identification camera from the ground) is 1.5m, and the identifiable distance is 25-90cm , Recognizable height range 110-220cm;
2、 Install the device at least 2 meters away from any direct light source
3、 In the case of body temperature detection, the recognizable distance is 30-50cm and the height range is 120-190cm
4、 In the case of body temperature detection, the indoor environment needs to be selected, and there should be no high-temperature heat source within the range of the camera, which will affect the result of body temperature detection
5、 In the body temperature detection scenario, the temperature measurement camera needs to be warmed up for 20 minutes after the device is turned on to achieve better detection accuracy

1.2 Get device activation code
1.2.1 Register FaceCloud account
1.2.1.1 Public Cloud
Go to https://cloud.facesec.com
The master account of the public cloud needs to be authorized by the vendor. Please contact your sales consultant.
Add sub-account:
Step1 After the master account logs in, add personnel, see <2.3.3.1 Personnel> for details.
Step2 'Authorizations' > 'Role', create a role. See <2.3.5.1.2 Add Role> for details.
Step3 'Authorizations' > 'Account Management', add an account. See <2.3.5.2.2 Add account> for details.
Step4 After the addition is complete, the person can use their email address to register for the public cloud.
1.2.1.2 Private Cloud
Step1 Open the login page of the FaceCloud and click on 'Register New Organization' in the upper right corner of the login page to enter the registration page.
Step2 Step2 Enter the organization information on the registration page and click on 'Confirm'
Step3 After successful registration, you can use this account to log in to the FaceCloud.
The method of adding a sub-account in a private cloud is the same as that in a public cloud.
1.2.2 Login FaceCloud

Public Cloud

Private Could
Step1 Browser access to https://cloud.facesec.com or private cloud address.
Step2 Enter the account number and password to log in. To log in to the public cloud account, you need to obtain an email verification code.
 ▲ After generating the administrator ID, you can use email or administrator ID to log in on the login page.
▲ If the administrator ID is not generated, please go to Step3. (public cloud)
▲ If the administrator ID has been generated, please skip Step3 and go to Step4. (public cloud)
Step3 (Public Cloud)If the administrator ID is not generated, it will enter the administrator ID generation interface.
Enter the new administrator ID
Enter a new login password
Click on 'OK'
 ▲ Once the administrator ID is generated, it cannot be modified. The login password can be changed afterwards.
▲ The administrator ID has been generated, this page will not be displayed.
▲ The administrator ID must be a half-width character, start with English, and can be a combination of English, numbers, and three special characters ( . _ - ). The length of the administrator ID is 6 to 100 characters.

Step4 (Public cloud) Enter the account password and 6-digit verification code, click on 'Login' to enter the home page of the workbench.
1.2.3 Get device activation code
Step1 On the left side of the FaceCloud, click on 'Device' > 'Device'.

Step2 On the 'Device' page, click on 'Device Activation Code' to open the 'Device Activation Code' dialog box. Includes 'Platform IP address', 'Activation Code', 'Device Group Code', and a QR code containing device activation information.

1.3 Connect device to FaceCloud
1.3.1 Power on
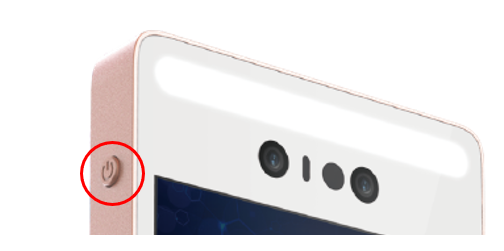
When the terminal is powered off, press and hold the power button to start the terminal. When the terminal is powered on for the first time, it enters the activation page.
1.3.2 Set system basic information
Step1 On the 'Language' page, set the system language of the terminal.
Click on the arrow below to enter the 'Date and Time' setting interface.

 ▲ The system language of the terminal can be modified in the terminal or FaceOffice.
▲ The language of some fields cannot be changed after initial selection. Such as default recognition rules, default time rules, etc.
Step2 In the 'Date and Time' setting interface, it is recommended to turn on the automatic setting (default value).
Select the time zone for the terminal.

 ▲ The system provides four time formats For example Apr.6, 1978 (default)6 Apr, 1978April 6, 1978 Thursday, April 6,
▲ Please make sure that the selected time zone is consistent with the time zone where you use FaceOffice.
To modify the time format, log in to Terminal Management > General > Date & Time.
Click on 'Next' to enter the 'Network Configuration' interface.
1.3.3 Network Setting (optional)
Network settings, used to set the network connection method of the terminal, you can choose 'WLAN' or 'LAN' .
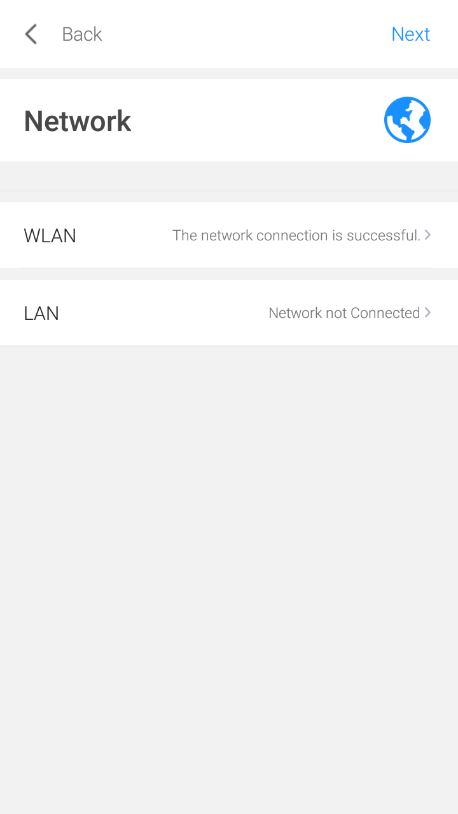
WLAN, select the appropriate network connection
LANAfter the device is connected to the network cable, it is recommended to turn on 'Auto Obtain' so that the device can automatically obtain network information.
1.3.4 Select operating mode
On the 'Select Operation Mode' interface, select 'Cloud'。
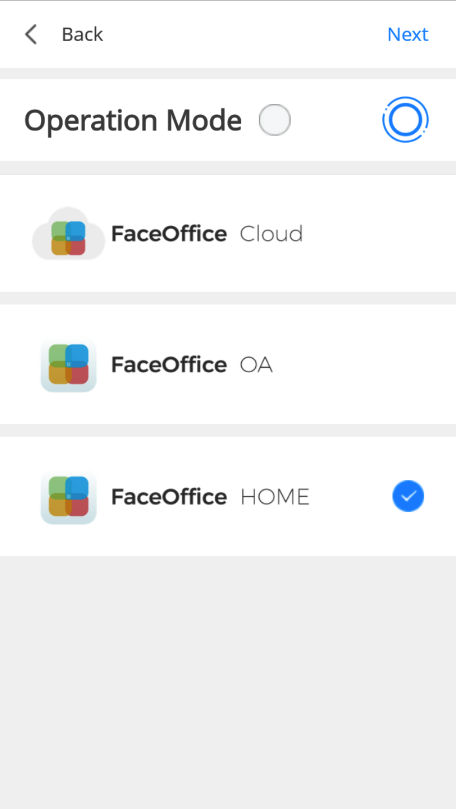
Click on 'Next'.
1.3.5 Enter activation code
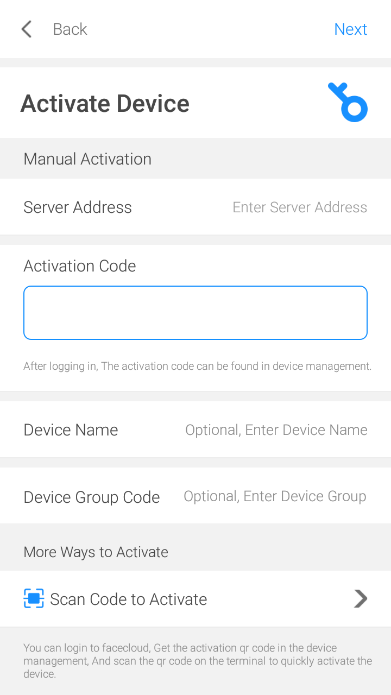
Enter project description
| NO. | project | Description |
|---|---|---|
| 1 | server address | Required |
| 2 | server address | Required |
| 3 | device name | Optional |
| 4 | device group | Optional |
Input method 1: Activate by scanning the code, and automatically enter the server address, activation code, device name, and device group information. (recommend)
Input method 2: Manual input through the soft keyboard.
Click on 'Next' and it will display 'Device activation successful'
1.3.6 Agree agreement terms
Please confirm the 'Pledge to Use' and 'Safety Terms' on the 'Welcome' page.
'Read and Agree' is selected by default. If you agree, click on 'Get Started'.
Activation ends. Enter the terminal work page.
 ▲ If no terminal administrator is set, the terminal management page cannot be entered.
▲ The terminal default administrator set in the cloud will be automatically set to the device.
1.4 Set terminal administrator
1.4.1 Create terminal administrators.
Steps to enter: Left menu → Device → Administrator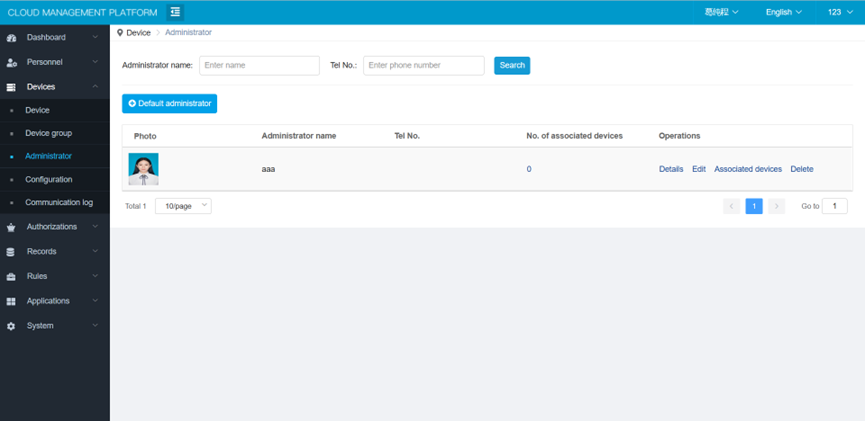
Click on 「Default administrator」
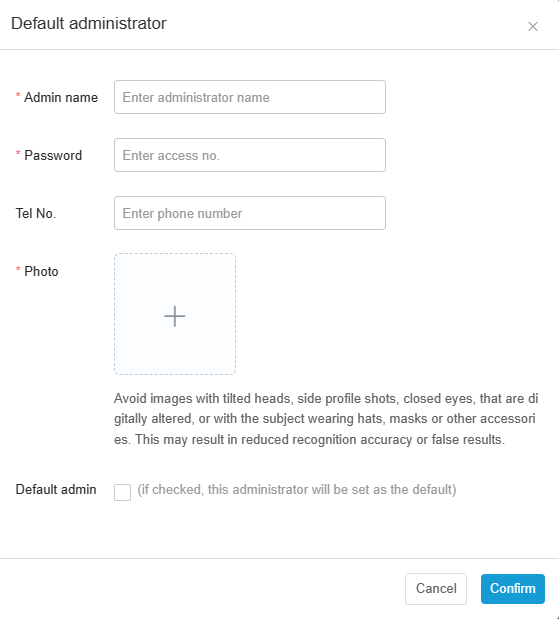
| NO. | Option | Description |
|---|---|---|
| 1 | Admin name | Required |
| 2 | Password(four digits) | Required |
| 3 | Tel No. | Required |
| 4 | Photo | Required |
| 5 | Default admin | Required If checked, the administrator will automatically become the administrator of all terminals of the tenant. |
1.4.2 Set administrator to designated terminal
Click on「Associated Device」
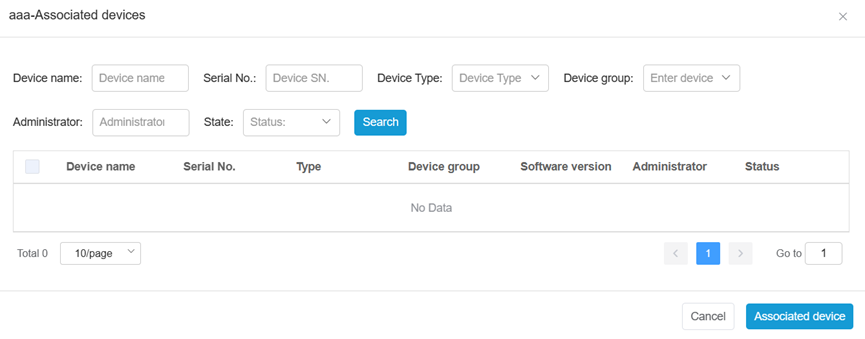
Select the terminal to be associated, and click on 'Associate Device'.
 ▲ The terminal administrator is the administrator who directly operates the device, or directly logs in to the device through FaceOffice.
▲ Terminal administrators are different from cloud platform administrators.
▲ If it is the default administrator, it will automatically complete the device association without this setting operation.
▲ One terminal can set up to 10 terminal administrators.
1.5 Working mode
On the identification interface of the terminal, swipe up from the bottom of the screen to display the operation icons.

Press the icon marked by the red line in the figure to open the terminal administrator login interface.
The terminal administrator who has been set to the terminal can log in to the terminal in two ways: 'swipe face' and 'enter password'.
After successful login, you will enter the setting interface.
Working mode setting, used to set the working mode of the terminal, you can choose 'temperature detection mode', 'identity authentication mode' and 'temperature detection + identity authentication mode'.
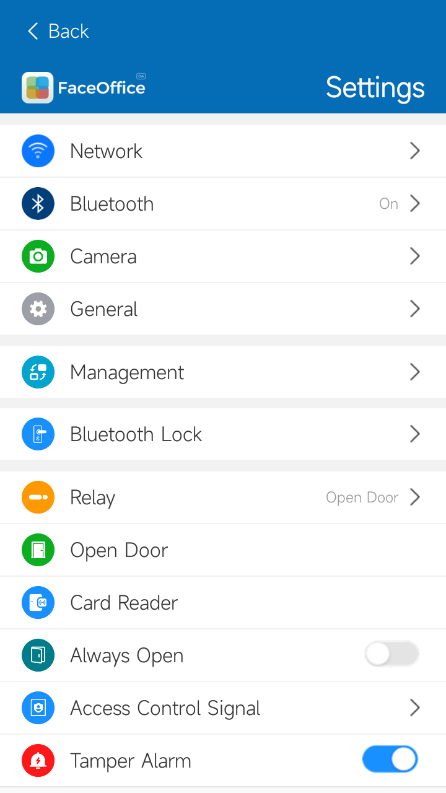
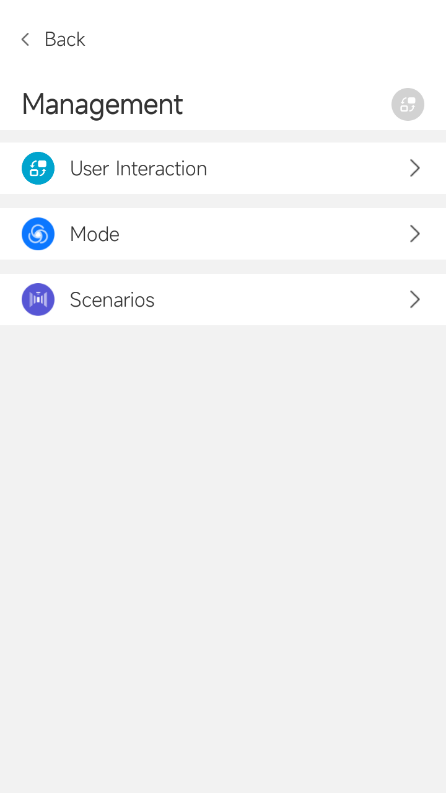
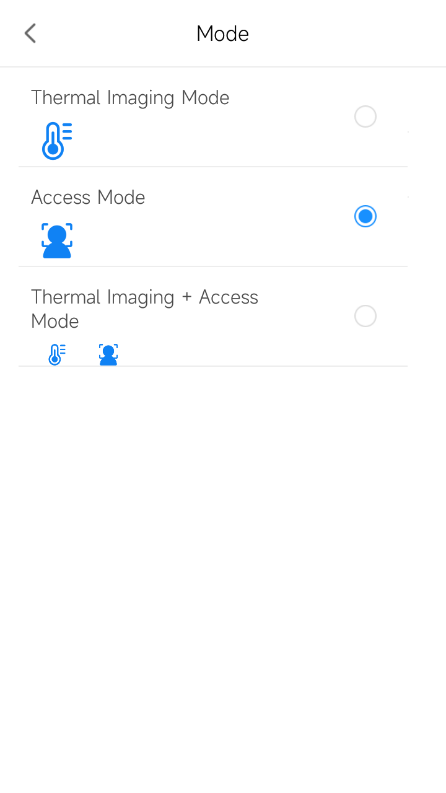
| NO. | project | Description |
|---|---|---|
| 1 | Termal Imaging Mode | Applicable to only temperature measurement scenarios. No need to import people. |
| 2 | Access Mode | Applicable to scenarios that only do identification (default value) |
| 3 | Termal Imaging+Access Mode | Applicable to scenarios of simultaneous identity authentication and temperature measurement. |
Please select the working mode according to the actual application scenario.
1.6 Alarm Notification
Steps to enter: Left menu → System → Alarm Notification

Step1 Enter the information of the alarm group and alarm person
| NO. | Option | Description |
|---|---|---|
| 1 | Alarm Group | Required |
| 2 | Name | Required |
| 3 | Email address | Required |
Step2 Click on'Create'
 ▲ At present, only the alarm notification of high temperature is supported.
1.7 Photo quality requirements
1.7.1 Photo requirements
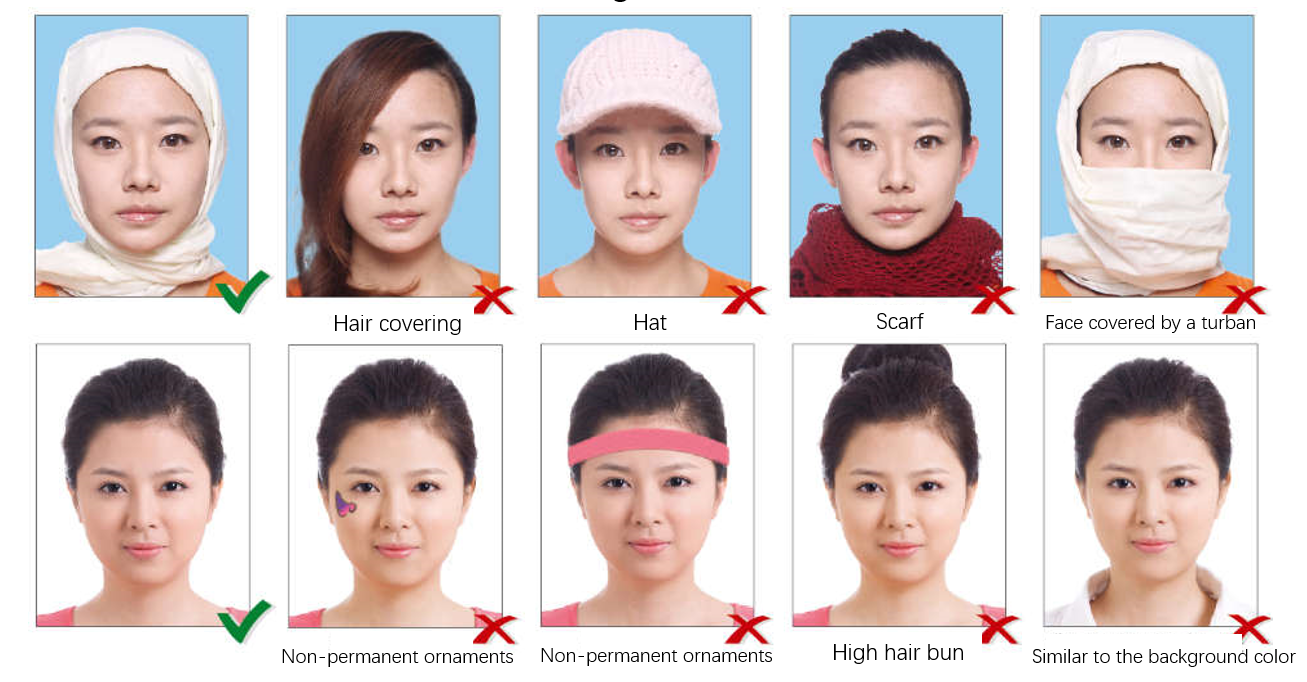
The registrant should keep his shoulders level, face the camera registrant naturally, open his eyes naturally, his hair should not cover his eyes, and he should not wear heavy makeup
The registrant shall not wear glasses with uniform lighting, no shadow on the face, uniform color of the bright spot background, no gradient, no shadow, other people or objects
1.7.2 Specification requirements for digital photo files
The file image format is JPEG JPG PNG
The image file size range is between 20K bytes and 1MB bytes. The photo resolution is not higher than 1024*1024
1.7.3 Examples of requirements
1.7.3.1 Light, exposure and portrait position
The photo environment is evenly lit and the portrait position is centered
Moderate exposure, no shadows, no bright spots

1.7.3.2 Background
Uniform background color, no gradients, no other people or objects
The background color is uniform white or light blue 
1.7.3.3 Posture
Correct posture
Natural level of shoulders
Face the camera

1.7.3.4 Facial expression
Natural expression
Glasses open naturally
Lips closed naturally

1.7.3.5 Face covering
Hair must not cover eyes
The registrant must not use a head covering, and non-permanent ornaments must not cover the face
Face and clothing should be in contrast to the background color
1.7.3.6 Quality and others
Accurate focusing, no red eyes, no distortion of human face
Paper photos have clear portraits without blurring (scanning noise), dirt, wrinkles, borders and scratches
No makeup
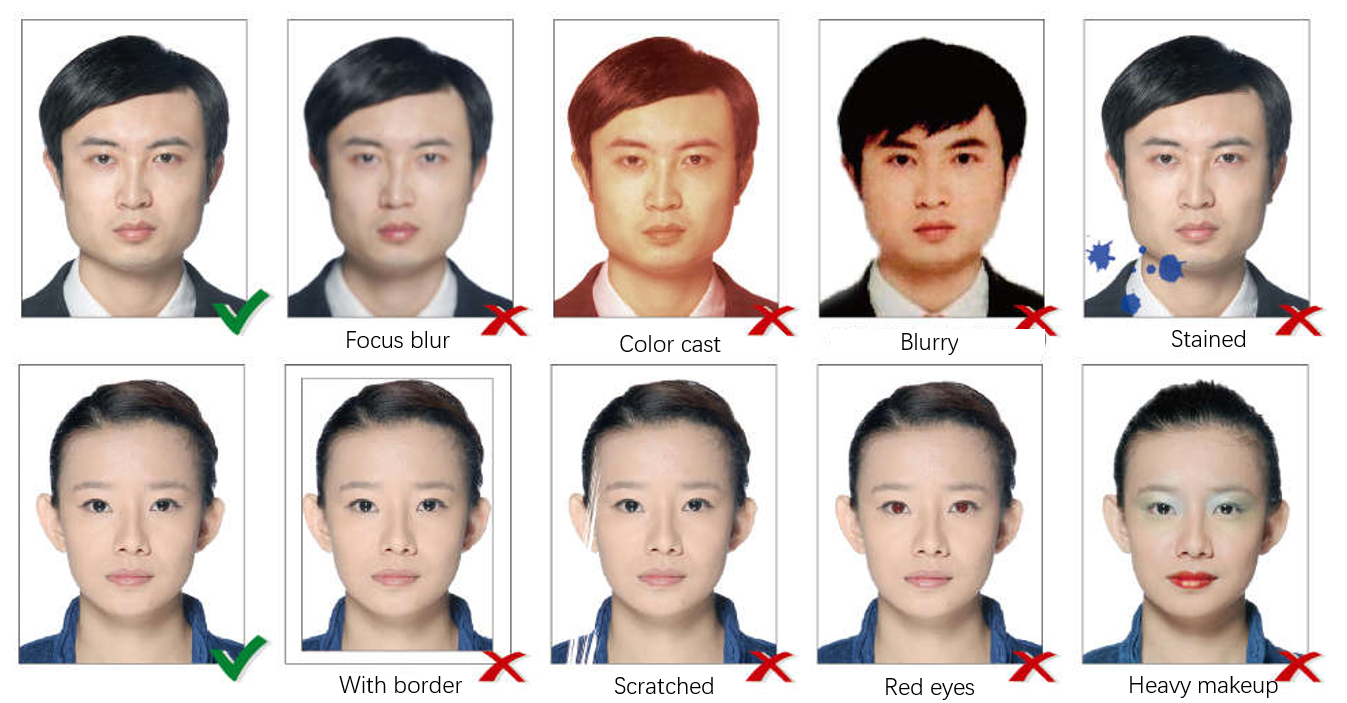
No obstructions (such as hands, toys, etc.)

1.8 Personnel registration
1.8.1 Add person
Step1 In the list on the left side of the FaceCloud, click on Personnel > Personnel to open the Personnel page.

Step2 On the Personnel page, click on Add New User to open the Add Person dialog box.
Step3 In the ' Add New User ' dialog box, fill in the personnel information:
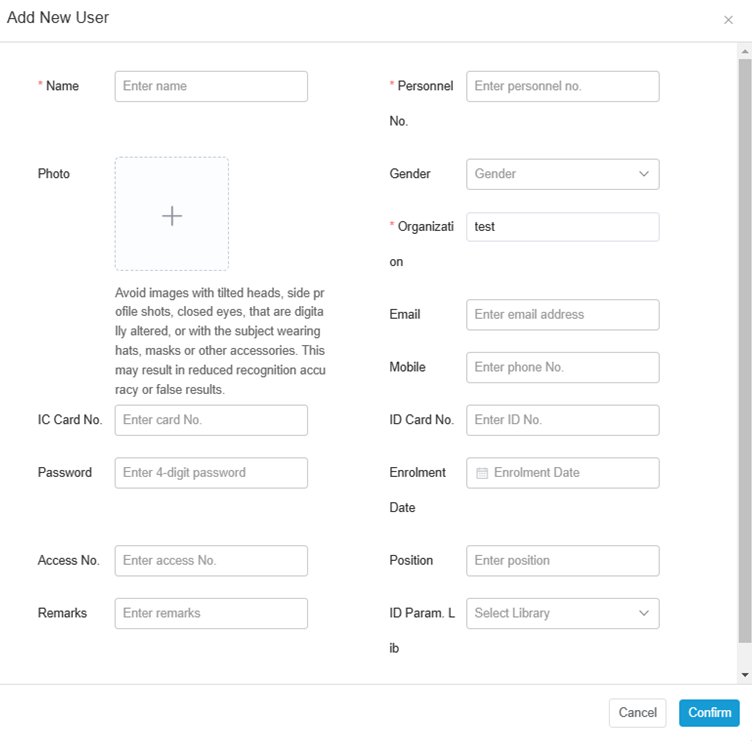
Step4 Click on 'Confirm' to save the settings.
1.8.2 Import people
Step1 In the list on the left side of the FaceCloud, click on Personnel > Personnel to open the Personnel page.
Step2 On the Personnel page, click on Bulk Add to open the Data Import page.
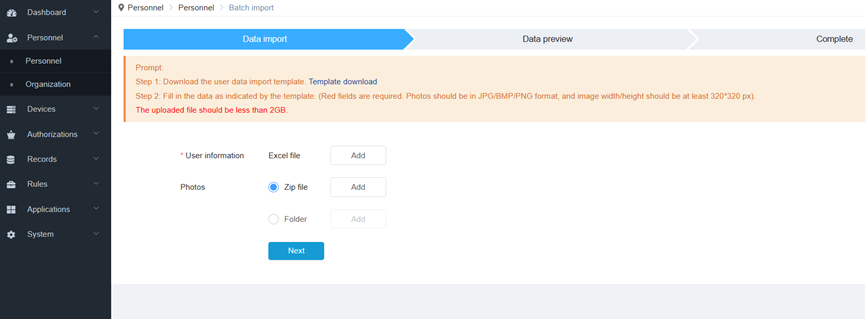
Step3 On the Data Import page:
Click on 'Download Template' to download the personnel list template and follow the 'tips' requirements to prepare the personnel data.
Click on 'Personnel Information' > 'Add' to upload a list of people;
(Optional) Click on 'People Photos' > 'zip package/folder' > 'Add' to specify the zip package/folder where the photo is located.
Click on Next
After the personnel data upload is complete, open the 'Data Preview' page.
 Note: The number of people added in a single batch is recommended to be less than 20,000.
Step4 On the 'Data Preview' page:
Confirm that the personnel data is correct;
Click on 'Import'
When the import is complete, open the 'Finish' page.
Step5 On the 'Finish' page, review the results of the import. If there is an import failure, click on 'Failure Record Export'; otherwise, click on 'Finish'.
1.9 Rule
1.9.1 Add rule
Steps to enter: Left menu → Rules → Recognition Rule

Step1 On the 'Identification Rules' page, click on 'New Recognition Rule'
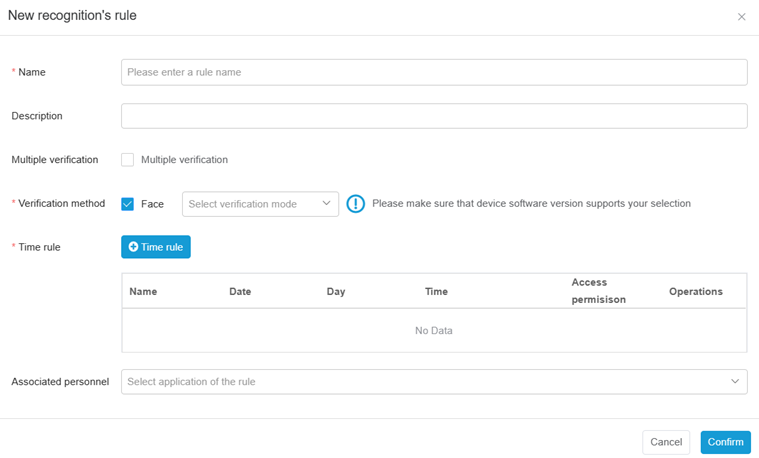
Step2 In the ' New Recognition Rule' dialog box, fill in the identification rule information
| NO. | Option | Description |
|---|---|---|
| 1 | Name | Required |
| 2 | Description | Optional |
| 3 | Multiple verification (Private Cloud) | To create a multi-identification rule, you need to enable the multi-identification function of the device in Device > Device Management > Settings. |
| 4 | Verification method | Required Set the identification method. Multiple identification methods can be set at the same time. |
| 5 | Time rule | Required Set time periods when traffic is allowed or not. |
| 6 | Associated personnel | Required Add people to whom this access rule applies. There are two ways to add by person or by organization. |
Step3 Click on 'Confirm' to save the settings.
1.9.2 Deliver identification rules
Steps to enter: Left menu → Rules → Rule application

Step1 In the identification rule list, click on 'Rules Delivery' in the 'Action' column to open the 'Rules Delivery' dialog box.
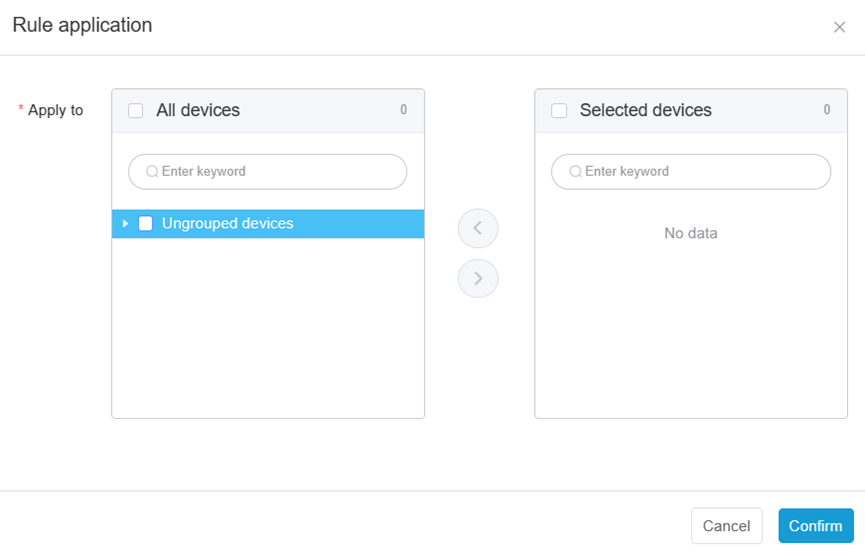
Step2 Click on the arrow to add one or more devices to the 'Selected Devices' list.
Step3 Click on 'Confirm' to deliver the identification rules and related personnel to the specified device.
2 FaceCloud
2.1 Application description
2.1.1 Overview
The business deployment of the FaceCloud can be divided into the following steps, such as Fig 38As shown.

FaceCloud business flow
| Step | Description |
|---|---|
| Device settings | Remotely set the terminal, including providing terminal activation code/information, group management, basic settings, and administrator assignment. |
| Personnel | Manage personnel and organizations as the basis for access and application settings; set the operation permissions of the FaceCloud. |
| Rule | Based on the system data, set the terminal identification method and access rules. |
| Application | Set up business functions based on system data. For example, visitors, attendance, letter sending, etc. |
| System operation and maintenance | Daily inspection and management of the system status. |
2.1.2 Device settings
In the cloud service mode, the terminal needs to cooperate with the FaceCloud.
| Task | Scene description | Operation |
|---|---|---|
| Activate/Add Terminal | In the cloud service mode, the steps for terminal activation are as follows: 1) The FaceCloud generates the activation QR code and activation information; 2) Scan code or input information on the terminal; 3) Activate the terminal and automatically add the terminal information to the FaceCloud. | 1.3 Get device activation code |
| Setting up device group | Group the terminals that have been activated and added to the FaceCloud. | 2.3.4.2 Device grouping |
| Synchronize device information | Synchronize device information, which is used to synchronize the parameters of the terminal that has been set up (referred to as the 'source terminal') to other terminals (referred to as 'destination terminal'). | 2.3.4.1.2 Synchronize device information |
| Add terminal administrator | In the cloud service mode, you need to add a terminal administrator to the FaceCloud. The steps are as follows: 1) Add terminal administrator 2) Associate terminal equipment. The terminal administrator can log in to the terminal and set the terminal within the authority. | 2.3.4.3.2 Add administrator 2.3.4.3.5 Associated equipment |
| Set the terminal basic function | In the cloud service mode, the terminal administrator can remotely set the basic functions of the terminal through the FaceCloud. | 2.3.4.1.6 Set up device |
| Identification threshold library is set. | In the cloud service mode, the identify threshold library is set by the FaceCloud and delivered to the terminal. | 2.3.4.4 Configuration management |
2.1.3 Personnel
In the cloud service mode, through the FaceCloud, the management of personnel information, equipment and other data is convenient for subsequent access and application settings based on this data.
| Task | Scene description | Operation |
|---|---|---|
| Set up people/organizations | Premise: Identification threshold library is set. In the cloud service mode, people can be added and grouped through the FaceCloud. | 2.3.3 Personnel |
| Set blacklist | Set no-pass persons, and automatically deliver to the terminal. When blacklisted personnel register at the front desk, visit appointments, and pass through the terminal, the system issues an early warning. | |
| Set role/account | To set the operation permission of the FaceCloud and its applications, the steps are as follows: 1) Add roles, set access permissions for personnel data, device data, application data, platform operation permissions, and application authorization. 2) Add the cloud management platform administrator account of the specified role and permissions. | 2.3.5.1.2 Add role 2.3.5.2.2 Add account |
2.1.4 Rule
In the cloud service mode, through the FaceCloud, based on personnel data, set the terminal access method.
| Task | Scene description | Operation |
|---|---|---|
| Identification rule | Set the identification method adopted by the personnel when the terminal is in the designated time. | 2.3.7.1 Identification rule |
2.1.5 Application
In the cloud service mode, through the FaceCloud, application settings such as visitor, time and attendance, letter sending, etc., in order to achieve business applications based on the access identification records collected by the terminal.
| Task | Scene description | Operation |
|---|---|---|
| Set management permissions | The administrator needs to have the operation permission of the "application" module and the application management permission. For details, please refer to: 2.1.3 Personnel > Set role/account | 2.3.5.1.2 Add role 2.3.5.2.2 Add account |
| Application authorization | Authorize applications to read FaceCloud data. | 2.3.8.2 Create an application |
| Open application page | 1) In the list on the left side of the FaceCloud, click Dashboard > Home to open the Home page. 2) In the "Basic Application" area of the "Home" page, click the application icon to open the application operation page. Applications include: visitors, letter sending, attendance, and video intercom. For the specific content of its business settings, please refer to the user manual of the application. |
|
FaceCloud
| Task | Scene description |
|---|---|
| blacklist | Set up a list of prohibited people. |
| Linkage strategy | Set the person's face to be recognized once at the collection terminal to realize the passage of multiple linkage terminals. |
| Visitor | Set to manage visitor personnel: 1) Support front desk registration in building scenes and enterprise scenes |
| Media Jet | Set the playback task to the terminal. |
| Attendance | Set attendance rules, and record and count staff attendance on working days. |
2.1.6 System operation and maintenance
During normal use, the system status is inspected and managed daily.
| Task | Scene description | Operation |
|---|---|---|
| Query system information | Query the running status of the system, including overview information, early warning information, and operation logs. | 2.3.2.1.1 Query overview information 2.3.2.2 Query warning information 2.3.2.3 Query operation log |
| Query/Export/Archive identification records | Query personnel's travel records in the terminal. | 2.3.6.1 Query identification records 2.3.6.1 Export identification records 2.3.9.1 Archive identification record |
| Modify terminal/person/passage/application settings | Optimize/change existing settings. | 2.3.4 Device settings 2.3.3 Personnel 2.3.5 Rule 2.3.8 Application |
2.2 Operating Description(User Center)
2.2.1 Login
Step1 Open the FaceCloud login page and enter the mobile phone login interface by default; if you need to log in with an email, click on 'Email login' to switch.
Step2 At the login interface, fill in the account information:
| Option | Description |
|---|---|
| Mobile/Email | Used to enter the mobile phone number/email of the registered account. |
| Password | Used to enter the password of the registered account. |
| Verify code | Used to enter the graphic verification code.  Note: 1) When the 'password' is entered incorrectly three times in succession, the 'Verification Code' option is displayed; Note: 1) When the 'password' is entered incorrectly three times in succession, the 'Verification Code' option is displayed; 2) Click on the picture to refresh the verification code. |
Step3 Click on to Login'.
After the login is successful, open the welcome page.
 Note:
Note:
Because each user has different permissions, the FaceCloud only displays the operation pages within the user's permissions.
When the 'password' is entered incorrectly 10 times within 24 hours, the account is locked for 10 minutes, and you can continue to try to log in after 10 minutes.
If you enter the wrong password and cannot log in, click on 'Forgot Password' to retrieve the account password. For instructions, see:02.2.2 Recover password
2.2.2 Recover password
 Note: It is only provided for the unified public network system, and this function is not available during privatization deployment.
Step1 Open the login page of the FaceCloud, and by default open the login interface of mobile phone number; if you need to log in with an email, click on 'Email login' to switch.
Step2 On the login interface, click on 'Forgot Password' to open the password retrieval page. By default, the password is retrieved using the mobile phone; if you need to retrieve the password using the mailbox, click on 'Mailbox Retrieve' to switch.
Step3 On the phone to retrieve the password page, enter the information:
| Attributes | Description |
|---|---|
| Mobile/Email | Registered mobile phone/email for entering account number. Click on 'Get Verification Code', the system sends a 6-digit verification code to the designated registered mobile phone/email. |
| Verify code | Used to enter the verification code sent to the registered mobile phone/email. |
| new password | Used to reset the account password. |
Step4 Click on 'OK' to save the settings; enter the 'Confirm Password' correctly and log in again.
2.2.3 Edit personal information
Step1 In the upper right corner of the FaceCloud operation page, click on the user name> 'personal center' to open the 'personal center' page.
Step2 On the 'Profile' page:
Click on 'Edit' after the nickname to modify the nickname;
Click on 'Change Password' after the password to change the password;
Click on 'Replace' after the account information to modify the registered mobile phone number/email;
Get and enter the verification code.
Step3 Click on 'Save'.
2.3 Operation Decription(FaceCloud)
2.3.1 Overview
The FaceCloud includes 8 functional modules: workbench, personnel, equipment, permissions, records, rules, applications, and settings:
| Name | Description |
|---|---|
| Dashboard | Used to query daily monitoring information, including user information, terminal warning, operation log, and provide quick access to rules, visitor application, letter application, and self-registration application. |
| Personnel | Used to manage passers and their information; and group people. |
| Device | Used to manage the terminal and its information, and group the terminals; set the administrator and associate the terminal; set the terminal basic parameters; set the identification threshold library; and deliver the configuration. |
| Authority | Used to manage FaceCloud permissions based on roles. |
| Record | Used to query/manage the identification record uploaded by the terminal. |
| Rule | Used to manage the identification rules and deliver the identification rules bound to the personnel information to the terminal. |
| Application | Used to manage application authorization. |
| Set up | Used for operation and maintenance of the system, including archive identification records, management personnel account, and replacement of the main administrator. |
2.3.2 Dashboard
Dashboard, used to query daily monitoring information, including user information, terminal warning, operation log; set user information; provide quick entry for rules and applications.
2.3.2.1 Home
The home page is used to query overview information, including: terminal early warning statistics, the latest operation log; provides rules, visitors, letter sending, self-registration, linkage, attendance, blacklist, and video intercom application quick entry.
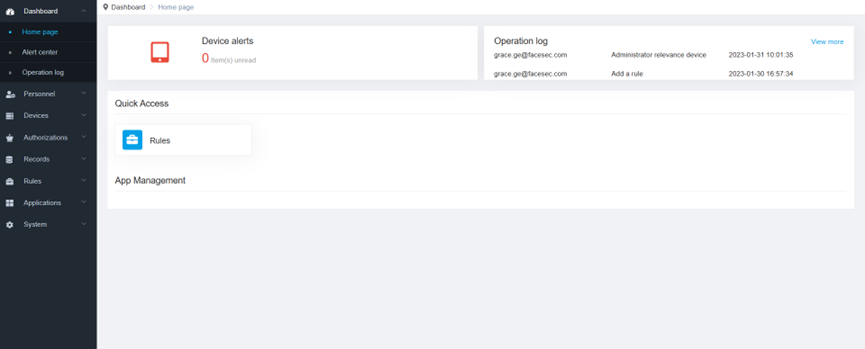
2.3.2.1.1 Query overview information
Step1 In the list on the left side of the FaceCloud, click on 'Dashboard' > 'Home' to open the 'Home' page to view the overview information and quick entry.
The overview information includes: user information, terminal warning statistics, and latest operation logs.
Quick entry: warning center, operation log, identification rules, basic application.
Step2 On the Home page:
Click on user name to open the 'Profile' page to query user information.
User information includes: company, user ID, and software version.
Click on Device Alerts to open the Warning center page. For details, please refer to: 2.3.2.3 Query warning information
Click on Operation Log > View More to open the Operation Log page. For details, please refer to: 2.3.2.4 Query operation log
Click on 'Rules' to open the 'Identification Rules' page. For details, please refer to: 2.3.7.1 Identification rule
Click on app within basic application area to open the page for the specified app.
2.3.2.1.2 Set user information
Step1 In the list on the left side of the FaceCloud, click on Dashboard > Home to open the Home page.
Step2 On the Home page, click on 'Users'user name to open the 'Profile' page.
Step3 Click on 'Set/Modify' to set/modify the user's login password, binding phone, and mailbox.
2.3.2.2 Alert Center
The alert center page is used to query the warning information of the terminal. Warning type include:
| Types | Description |
|---|---|
| Over-heated | The temperature of the terminal exceeds 90 degrees Celsius. |
| Camera damage | The camera of the terminal has failed. |
| Storage alarm | The available storage space of the terminal is less than 15%. |
| Device offline | The terminal is not connected to the FaceCloud. |
| Device removed | The wall-mounted type terminal with the 'device removal alert' turned on is removed. |
| Speed gate alarm | The terminal recognizes that the person is trailing, or the person is reversed. |
| Alarm for personnel entering and leaving | Blacklist personnel are available. |
| Body Temp Alarm | The body temperature exceeds the set value. |
| OTA software download failed | The terminal failed to download software from the cloud platform. |
| Door SensorState Detection | The state of the door sensor is changed from the default state. |
| Door Access Button | Warning when opening the door. |
| Smoke Alarm | The smoke detector detected excessive smoke. |
| Doorbell | Doorbell signal received. |
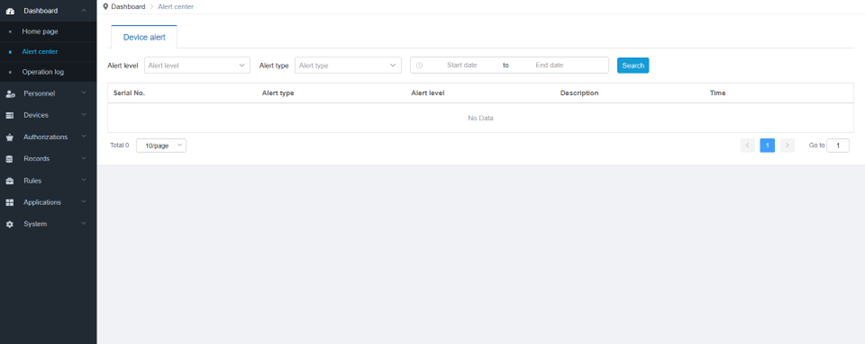
Query warning information
Step1 In the list on the left side of the FaceCloud, click on Dashboard > Alert center to open the Warning center page to view the terminal warning information.
The warning information includes: serial number, warning type, warning level, details, time.
Step2 On the Warning center page:
1) Enter the 'Warning Level' and click on 'Search' to query the warning information of the specified warning level.
2) Enter the 'Warning Type' and click on 'Search' to query the warning information of the specified warning type.
3) Enter the 'Start Date' and 'End Date' of the 'Alert Time' and click on 'Search' to query the warning information for the specified time period.
2.3.2.3 Operation log
The operation log page is used to query the log information of the administrator to operate the FaceCloud.
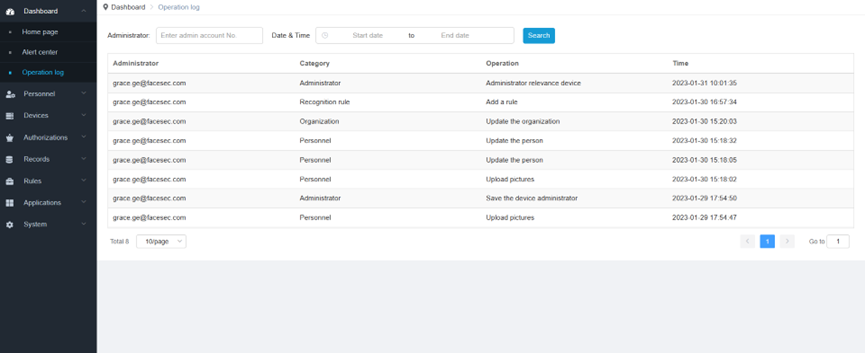
Query operation log
Step1 On the left side of the FaceCloud, click on Dashboard > Operation Log to open the Operation Log page to view the log list of the administrator operating the FaceCloud.
The operation log includes: administrator, main function, specific operation, and operation time.
Step2 On the Operation Log page:
Enter 'Administrator' and click on 'Search' to fuzzy query the operation log of the specified administrator.
Enter the Start Date and End Date of the Operation Time to query the operation log for the specified time period.
2.3.3 Personnel
Personnel management for managing passers and their information; grouping people.
2.3.3.1 Personnel
Personnel page for managing passers and their information.
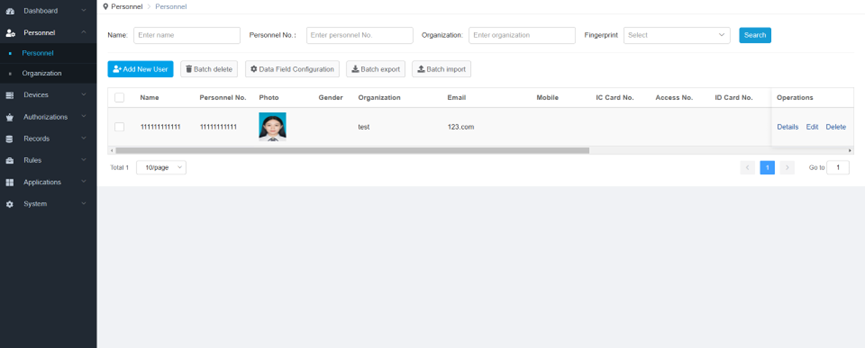
2.3.3.1.1 Query personnel
Step1 In the list on the left side of the FaceCloud, click on Personnel > Personnel to open the Personnel page to view the list of existing people.
Step2 On the 'Personnel' page:
Enter 'Name' and click on 'Search' to query the person with the specified name;
Enter the 'Personnel Number' and click on 'Search' to query the person with the specified personnel number;
Enter the organization and click on Search to query the people in the specified organization.
Select 'Fingerprint' and click on 'Search' to inquire who has fingerprints.
2.3.3.1.2 Query personnel details
Step1 In the list on the left side of the FaceCloud, click on Personnel > Personnel to open the Personnel page.
Step2 On the Personnel page, search for and target the designated person.
Step3 In the personnel list, click on 'Details' in the 'Action' column to open the 'Personnel Details' dialog box to query the details of the designated person.
 Note: The Person Information field contains 13 default required fields and 10 custom fields. For details on how to configure the fields, see: 2.3.3.1.9 Field configuration
2.3.3.1.3 Add single person
Step1 In the list on the left side of the FaceCloud, click on Personnel > Personnel to open the Personnel page.
Step2 On the Personnel page, click on Add Person to open the Add Person dialog box.
Step3 In the 'Add Person' dialog box, fill in the personnel information:
| Option (* required) | Description |
|---|---|
| Name* | Used to specify the name of the person. Data type: Chinese, English, numbers, symbols Value range: ≤ 64 bits Configuration Description: The following special characters are not supported: ''', '%', '', '/', '|', '_', '&', '#', ':'. |
| Personnel number* | Used to assign a person's number and uniquely identify the person. Data type: number, alphabet, underline, hyphen Value range: ≤ 32 bits  Caution: Personnel number cannot be modified once set, please be cautious. Caution: Personnel number cannot be modified once set, please be cautious. |
| Photo | Used to enter a photo of the person. |
| Gender | Used to set the gender of the person. |
| Organization* | Used to set the organization to which the person belongs. Configuration Description: 'Organization' is a preset organization. For details, please refer to: 2.3.1.2.2 Organization |
Used to set up a person's email address.  Note: Note: 1) The personnel mailbox needs to be unique. 2) After the person is added, the mailbox can only be edited and modified by the person; the administrator cannot perform this operation. | |
| Mobile number | Used to set the mobile number of the person.  Note: Note: 1) The personnel mailbox needs to be unique. 2) After the person is added, the mobile phone number can only be edited and modified by the person; the administrator cannot perform this operation. |
| IC card number | Used to set the number of the non-Wiegand IC card bound to the person. Data type: English, number Value range: ≤ 32 bits |
| Identity number | Used to set the ID number of the person. |
| Verify password | Used to set a 4-digit verification password. |
| Access card number | Used to set the number of the non-Wiegand IC card bound to the person. Data type: number Value range: ≤ 20 bits |
| Identification Threshold Library | Used to specify the identification parameter library to which the person belongs, so as to distinguish between people who are different in different groups. Configuration Description: 'Identification Threshold Library' needs to be set in advance. For details, please refer to: 2.3.4.4.2 Add identification threshold library |
| Fingerprint 1 | Used to synchronize the fingerprints collected by the terminal. |
| Fingerprint 2 | Used to synchronize the fingerprints collected by the terminal. |
Used to set custom information fields.  Note: The person information can contain 10 custom fields. For details on how to configure the fields, see: 2.3.3.1.9 Field configuration Note: The person information can contain 10 custom fields. For details on how to configure the fields, see: 2.3.3.1.9 Field configuration  Caution: In public cloud scenario, custom fields are prone to data conflicts and are not recommended. Caution: In public cloud scenario, custom fields are prone to data conflicts and are not recommended. |
Step4 Click on 'OK' to save the settings.
2.3.3.1.4 Import people
Step1 In the list on the left side of the FaceCloud, click on Personnel > Personnel to open the Personnel page.
Step2 On the Personnel page, click on Bulk Add to open the Data Import page.
Step3 On the Data Import page:
1) Click on 'Download Template' to download the personnel list template and follow the 'tips' requirements to prepare the personnel data.
2) Click on 'Personnel Information' > 'Excel' > 'Add' to upload a list of people;
3) (Optional) Click on 'People Photos' > 'zip package/folder' > 'Add' to specify the zip package/folder where the photo is located.
4) Click on Next
After the personnel data upload is complete, open the 'Data Preview' page.
 Note: The number of people added in a single batch is recommended to be less than 20,000.
Step4 On the 'Data Preview' page:
1) Confirm that the personnel data is correct;
2) Click on 'Import'
When the import is complete, open the 'Finish' page.
Step5 On the 'Finish' page, review the results of the import.
If there is an import failure, click on 'Failure Record Export'; otherwise, click on 'Finish'.
2.3.3.1.5 Edit person
Step1 In the list on the left side of the FaceCloud, click on Personnel > Personnel to open the Personnel page.
Step2 On the Personnel page, search for and target the designated person.
Step3 Click on 'Edit' to open the 'Edit person' dialog box.
Step4 In the 'Edit Organization' dialog box, enter personnel information. For details, see: 1.8.1 Add person
Step5 Click on 'OK' to save.
2.3.3.1.6 Delete single person
 Caution:
Caution: Deleted person information cannot be recovered. Please be cautious.
The primary administrator cannot be deleted.
Step1 In the list on the left side of the FaceCloud, click on Personnel > Personnel to open the Personnel page.
Step2 On the Personnel page, search for and target the designated person.
Step3 Click on 'Delete' in the 'Action' column to delete the specified person.
2.3.3.1.7 Delete people in batches
 Caution:
Caution: Deleted person information cannot be recovered. Please be cautious.
The primary administrator cannot be deleted.
Step1 In the list on the left side of the FaceCloud, click on Personnel > Personnel to open the Personnel page.
Step2 On the Personnel page, search for and target the designated person.
Step3 In the People list, select one or more check boxes in front of 'Name.'
Step4 Click on 'Batch Delete' to delete the specified people.
2.3.3.1.8 Export personnel data in batches
Step1 In the list on the left side of the FaceCloud, click on Personnel > Personnel to open the Personnel page.
Step2 On the 'Personnel' page, enter 'Name', 'Personnel Number' or 'Organization', click on 'Search' to query the designated person.
 Note:
Note:
1) If you do not set the search criteria, the default is to export the data of all people.
2) The number of people to export in a single transaction must be less than 5000.
Step3 Click on 'Batch Export' to export data for people who match the specified search criteria.
The exported data includes: an Excel spreadsheet of personnel information, and a zip package of personnel photos.
2.3.3.1.9 Field configuration
Step1 In the list on the left side of the FaceCloud, click on Personnel > Personnel to open the Personnel page.
Step2 On the 'Personnel' page, click on 'Field Configuration' to open the 'Field Configuration' dialog.
Step3 In the 'Field Configuration' dialog:
1) In the text box after the 'login password' in the 'Default Item' area, set the default password;
2) In the 'Optional' area, set/modify/select custom fields.
Step4 Click on 'OK' to save the settings.
 Note:
Note:
Added fields for existing people.
Hidden fields do not delete the existing field information.
2.3.3.2 Organization
Organization page for grouping passers-by for management and authorization.
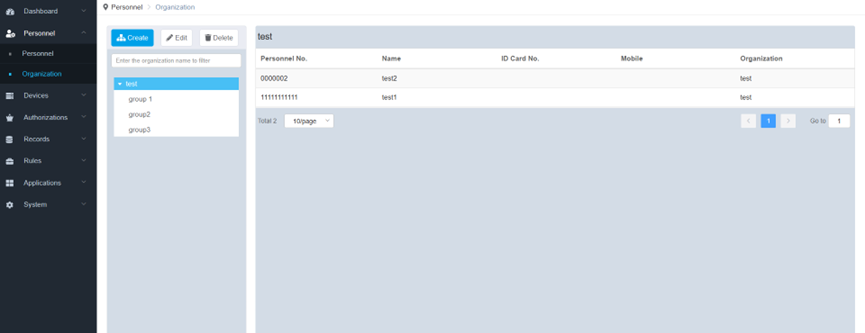
2.3.3.2.1 Query Grouping
Step1 In the list on the left side of the FaceCloud, click on 'Personnel' > 'Organization' to open the 'Organization' page.
Step2 On the left side of the 'Organization' page, the list shows the existing groupings and the organization's tree structure.
Step3 In the text box on the left list, enter a keyword to blur the query group name and filter the group that meets the query criteria.
Step4 In the list on the left, click on the group name and the right side shows the list of people in the specified group.
2.3.3.2.2 Add Group
Step1 In the list on the left side of the FaceCloud, click on 'Personnel' > 'Organization' to open the 'Organization' page.
Step2 On the 'Organization' page, search for and locate the group, which specifies the parent grouping of the new group.
 Caution: Once the 'parent organization' of the newly added group is set, it cannot be modified. Please be cautious.
Step3 Click on 'Add' to open the 'Add Organization' dialog box.
Step4 In the 'Add Organization' dialog:
1) 'Parent organization' defaults to Step2 Specify a grouping;
2) Enter 'name' to set the name of the newly added group.
Step5 Click on 'OK' to save the settings.
2.3.3.2.3 Edit organization
Step1 In the list on the left side of the FaceCloud, click on 'Personnel' > 'Organization' to open the 'Organization' page.
Step2 On the 'Organization' page, search for and locate the group.
Step3 Click on 'Edit' to open the 'Edit Organization' dialog box.
Step4 In the 'Edit Organization' dialog box, enter 'Name' and click on 'OK' to save the settings.
2.3.3.2.4 Delete organization
Step1 In the list on the left side of the FaceCloud, click on 'Personnel' > 'Organization' to open the 'Organization' page.
Step2 On the 'Organization' page, search for and locate the group.
Step3 If the specified group does not contain people, click on 'Delete' to open the confirmation delete dialog box, click on 'OK' to delete the specified personnel group.
Step4 If the specified group contains people, click on 'Delete' to open the 'Delete Organization' dialog box, which displays: The organization contains personnel information, please select the personnel processing method:
1) Delete all people in the organization and its own organization
2) Transfer all personnel within the organization and its own organization to: Need to specify destination organization
Click on 'OK'
 Caution: Once the group and its personnel are deleted, they cannot be modified. Please be cautious.
2.3.4 Device
Device management, used to manage the terminal and its information, and group the terminals; set up the administrator and associate the terminal; set the terminal basic parameters; set the identification threshold library; and deliver the configuration.
2.3.4.1 Device management
The device management page is used to manage the terminal and its information; remotely manage/control the terminal; import and deliver the prompt information; obtain the terminal activation code and information.
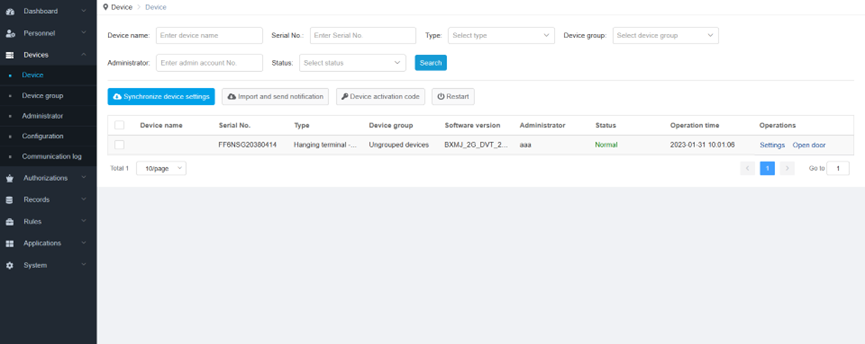
2.3.4.1.1 Query device
Step1 On the left side of the FaceCloud, click on 'Device' > 'Device Management' to open the 'Device Management' page to view the list of existing devices.
Device information includes: device name, serial number, type, device group, software version, administrator, status, and operation time.
Step2 On the 'Device Management' page:
1) Enter the 'Device name' and click on 'Search' to query the device with the specified name.
2) Enter the 'Serial number' and click on 'Search' to query the device with the specified serial number.
3) Enter 'Type' and click on 'Search' to query the device of the specified type.
4) Enter the 'Device Group' and click on 'Search' to query the devices belonging to the specified device group.
5) Enter 'Administrator' and click on 'Search' to query the device managed by the specified administrator.
6) Enter 'Status' and click on 'Search' to query the device with the specified status.
The device status includes two states: 'network disconnected' and 'normal'.
2.3.4.1.2 Synchronize device information
Synchronize device information, which is used to synchronize the parameters of the terminal that has been set up (referred to as the 'source terminal') to other terminals (referred to as 'destination terminal').
Step1 On the left side of the FaceCloud, click on 'Device' > 'Device Management' to open the 'Device Management' page.
Step2 On the 'Device Management' page, search for and locate the source terminal, and select the check box in front of 'Device Name'.
Step3 Click on 'Synchronize Device Configuration' to open the 'Prompt' dialog box. The FaceCloud has obtained the setup parameters from the specified terminal.
Step4 In the 'Prompt' dialog box, click on 'Batch Synchronization Settings' to open the 'Batch Synchronization Settings' dialog box.
Step5 In the 'Batch Synchronization Settings' dialog box, search for and locate one or more destination terminals, and select the check box in front of 'Device Name'.
Step6 Click on 'Sync' to sync the settings to the specified terminal.
2.3.4.1.3 Import and deliver prompt information
Step1 Contact technical support personnel to assist in generating prompt information files in JSON format.
Step2 On the left side of the FaceCloud, click on 'Device' > 'Device Management' to open the 'Device Management' page.
Step3 On the 'Device Management' page, search for and locate the specified device.
Step4 In the device list, select the check box in front of a 'Device name'.
Step5 Click on 'Import and Deliver Prompt Information' to open the 'Import and Deliver Prompt Information' dialog box.
Step6 In the 'Import and Deliver Prompt Information' dialog box, fill in the relevant information:
| Option | Description |
|---|---|
| Choose a language | The language used to set the prompt information. |
| Prompt message | Used to upload a prompt information file in JSON format. |
Step7 Click on 'Import and Sync' to import the specified prompt information and deliver it to the terminal.
2.3.4.1.4 Get device activation code
Step1 On the left side of the FaceCloud, click on 'Device' > 'Device Management' to open the 'Device Management' page.
Step2 On the 'Device Management' page, click on 'Device Activation Code' to open the 'Device Activation Code' dialog box. Includes 'Platform IP address', 'Activation Code', 'Device Group Code', and a QR code containing device activation information.
 Note: 'Device group code' required to preset, for specific operating instructions refer to: 2.3.4.2.2 Add device group
Step3 Click on 'Refresh' to refresh the 'Activation Code' and QR code.
The activation information and activation code are used to activate the terminal. For details, refer to: 'Face Recognition Terminal V2.0 User Manual', 3.4.2 Activate Terminal (Cloud Service Mode)
2.3.4.1.5 Restart device
Step1 On the left side of the FaceCloud, click on 'Device' > 'Device Management' to open the 'Device Management' page.
Step2 On the 'Device Management' page, search for and locate the specified device.
Step3 In the device list, select one or more of the check boxes in front of the 'Device Name'.
Step4 Click on 'Reboot' to reboot the specified device.
2.3.4.1.6 Set up device
Step1 On the left side of the FaceCloud, click on 'Device' > 'Device Management' to open the 'Device Management' page.
Step2 On the 'Device Management' page, search for and locate the specified device.
 Note: If the device status is 'Network disconnected', the device settings cannot be made.
Step3 In the device list, click on 'Settings' in the 'Operations' column to open the 'Device Settings' dialog box.
2.3.4.1.7 Open door
Step1 On the left side of the FaceCloud, click on 'Device' > 'Device Management' to open the 'Device Management' page.
Step2 On the 'Device Management' page, search for and locate the specified device.
 Note: If the device status is 'Network disconnected', the access control cannot be enabled.
Step3 In the device list, click on 'Open Door' in the 'Operation' column to open the access control.
2.3.4.2 Device grouping
Device grouping, used to group activated terminals for easy management and maintenance.
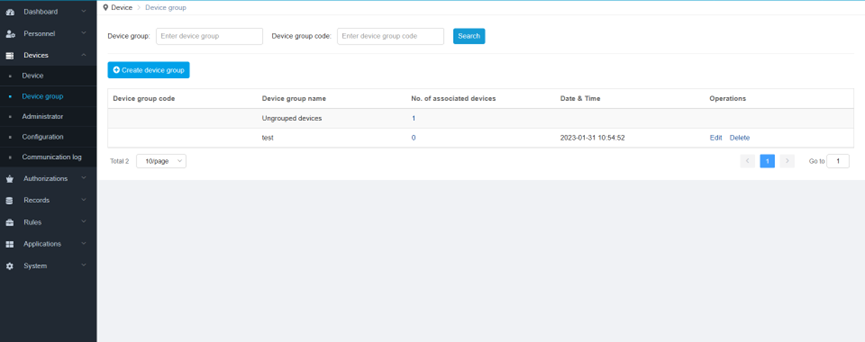
2.3.4.2.1 Query device grouping
Step1 In the list on the left side of the FaceCloud, click on 'Device' > 'Device Grouping' to open the 'Device Grouping' page to view the list of existing device groups.
The device group information includes: device group code, device group name, number of associated devices, and operation time.
Step2 On the 'Device Grouping' page:
1) Enter the 'Device Group' keyword and click on 'Search' to fuzzy query the device group with the specified name.
2) Enter the 'Device Group Code' and click on 'Search' to query the device group for the specified code.
Step3 In the device group list, click on the number in the 'Associated Devices' column to open the 'View Device Group Device' dialog box to view the device information associated with the specified device group.
Device information includes: device name, serial number, type, status, software version, and administrator.
2.3.4.2.2 Add device group
Step1 In the list on the left side of the FaceCloud, click on 'Device' > 'Device Group' to open the 'Device Group' page.
Step2 On the 'Device Group' page, click on 'Add Device Group' to open the 'Add Device Group' dialog box.
Step3 In the 'Add Device Group' dialog box, fill in the device group information:
| Option | Description |
|---|---|
| Device group | Used to set the name of the device group. |
| Device group code | Used to set up device group code. |
| Associated device | Used to set the association between a terminal and a device group. Configuration instructions: 1) Search for devices on the left 'Ungrouped devices' list, select one or more devices, click on '>' arrow, and move to the 'Added devices' list on the right to associate the devices with the device group. 2) Search for devices on the 'Added devices' list on the right, select one or more devices, click on '<' arrow, and move to the 'Ungrouped devices' list on the left to unassociate the terminal from the device group.  Note: Only one device group can be associated with each terminal. Note: Only one device group can be associated with each terminal. |
Step4 Click on 'OK' to save the settings.
2.3.4.2.3 Edit device group
Step1 In the list on the left side of the FaceCloud, click on 'Device' > 'Device Group' to open the 'Device Group' page.
Step2 On the 'Device group' page, search for and locate the specified device group.
Step3 In the device group list, click on 'Edit' in the 'Action' column to open the 'Edit device group' dialog box.
Step4 In the 'Edit device group' dialog box, fill in the device group information.
2.3.4.2.4 Delete device group
Step1 In the list on the left side of the FaceCloud, click on 'Device' > 'Device Group' to open the 'Device Group' page.
Step2 On the 'Device group' page, search for and locate the specified device group.
Step3 In the device group list, click on Delete in the Action column to delete the specified device group.
 Note:
Note:
1) Only the device group is deleted, and the device associated with the device group is not deleted.
2) The device associated with the device group is restored to the ungrouped device after device group deleted.
2.3.4.3 Administrator
The administrator page is used to set the terminal administrator, associate the terminal, and deliver it to the terminal.
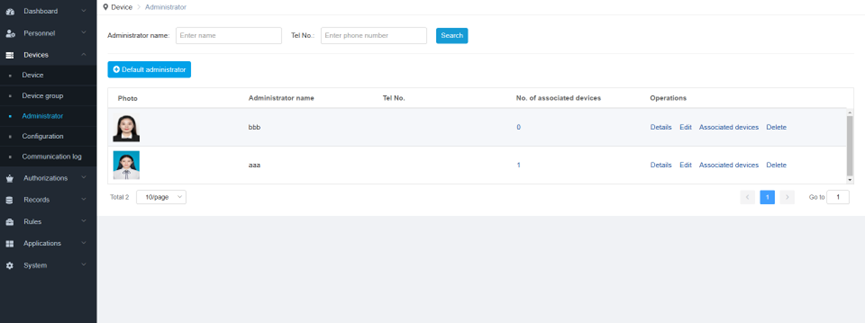
2.3.4.3.1 Query administrator
Step1 In the list on the left side of the FaceCloud, click on 'Device' > 'Administrator' to open the 'Administrator' page to view the list of existing administrators.
Administrator information includes: photo, name, mobile number, and number of associated devices.
Step2 On the 'Administrator' page:
1) Enter the 'Administrator Name' keyword and click on 'Search' to fuzzy query the administrator of the specified name.
2) Enter 'Mobile Number' and click on 'Search' to query the administrator of the specified mobile number.
Step3 In the administrator list, click on 'Number of associated devices' column to open the 'View Administrator Device' dialog box to view the device information associated with the specified administrator.
Device information includes: device name, serial number, type, status, device group, and software version.
Step4 On the 'Administrator' page, click on 'Details' in the 'Actions' column to open the 'View Administrator' dialog box to view administrator information.
Administrator information includes: name, password, mobile number, photo.
2.3.4.3.2 Add administrator
Step1 In the list on the left side of the FaceCloud, click on 'Device' > 'Administrator' to open the 'Administrator' page.
Step2 On the 'Administrator' page, click on 'Add Administrator' to open the 'Add Administrator' dialog box.
Step3 In the 'Add Administrator' dialog box, fill in the administrator information:
| Option | Description |
|---|---|
| Administrator name | Used to set the name of the administrator. |
| Password | A 4-digit password used to set the administrator login device. |
| Mobile number | Used to set the mobile number of the administrator. |
| Photo | Used to set up a frontal photo of the administrator. |
| Default administrator | Used to set whether the administrator is the default administrator.  Note: Note: 1) After the terminal in the cloud service mode is activated, the FaceCloud automatically delivers the default administrator as the device administrator. 2) The FaceCloud can set up to 10 default administrators. |
Step4 Click on 'OK' to save the settings.
2.3.4.3.3 Edit Administrator
Step1 In the list on the left side of the FaceCloud, click on 'Device' > 'Administrator' to open the 'Administrator' page.
Step2 On the 'Administrator' page, search for and locate the designated administrator. For details, please refer to: 2.3.4.3.1 Query administrator
Step3 In the administrator list, click on 'Edit' in the 'Action' column to open the 'Edit Administrator' dialog box.
Step4 In the 'Edit Administrator' dialog box, fill in the administrator information.
Step5 Click on 'OK' to save the settings.
2.3.4.3.4 Delete administrator
 Note: After the administrator deleted, it cannot be restored. Please be cautious.
Step1 In the list on the left side of the FaceCloud, click on 'Device' > 'Administrator' to open the 'Administrator' page.
Step2 On the 'Administrator' page, search for and locate the designated administrator. For details, please refer to: 2.3.4.3.1 Query administrator
Step3 In the administrator list, click on 'Delete' in the 'Action' column to open the Confirm Delete dialog box.
Step4 In the Confirm Delete dialog box, click on 'Confirm' to delete the specified administrator.
2.3.4.3.5 Associated equipment
Step1 In the list on the left side of the FaceCloud, click on 'Device' > 'Administrator' to open the 'Administrator' page.
Step2 On the 'Administrator' page, search for and locate the specified administrator.
Step3 In the administrator list, click on 'Associated Devices' in the 'Action' column to open the 'Associate Devices' dialog box.
Step4 In the 'Associate Devices' dialog, search for and locate the specified device.
Step5 In the device list:
1) Select the check box in front of 'Device Name' to associate the device.
2) Remove the check box in front of Device Name to disassociate the device.
Step6 Click on 'Associate devices' to save your settings.
2.3.4.4 Configuration management
The configuration management page is used to set the basic parameters of the terminal, set the identification threshold library and its parameters, and synchronize to the terminal.
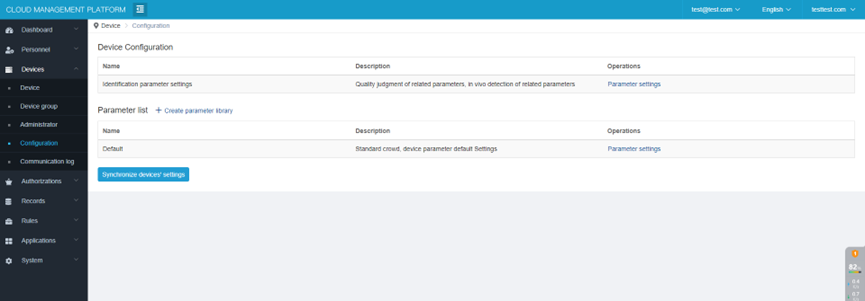
The identification threshold library is used to specify the library of people used for face recognition on the terminal. E.g:
There are three identification threshold libraries: A, B, C; the thresholds are set to: 90, 80, 70; the terminal has added 30 people, of which 10 belong to A, 10 belong to B, and 10 belong to C.
Assume that Alice performs 1:N identification on the terminal. The identification process is as follows:
Alice and A library 10 people scored, the highest score is a, 89 points;
Alice and B library 10 people scored, the highest score is b, 88 points;
Alice and C library 10 people scored, the highest score is c, 87 points;
According to the score from high to low, that is, a>b>c, so determine the comparison order is a, b, c;
a<90, the comparison failed;
b>80, the comparison is successful. Therefore, it is judged that Alice is b.
2.3.4.4.1 Set device basic parameters
Step1 On the left side of the FaceCloud, click on 'Device' > 'Configuration Management' to open the 'Configuration Management' page.
Step2 On the 'Configuration Management' page, in the 'Device Basic Settings' area, click on 'Recognition Parameter Settings' in the 'Action' column to open the 'Recognition Parameter Settings' dialog box.
Step3 In the 'Recognition Parameter Settings' dialog box, set the parameter values:
| Grouping | Option | Description |
|---|---|---|
| Photo Quality Judgment |
Used to judge the quality of photos from three aspects: angle, blur, and occlusion. | |
| Photo quality judgment switch |
Used to turn 'Photo Quality Judgment Switch' on or off. The default is on. When the switch is turned on, the quality of the photo can be judged from three aspects: angle, blur, and occlusion. |
|
| Angle limit | Used to limit the face angle of the snapshot. The default is on. | |
| Maximum fuzzy limit |
Used to limit the blurriness of the snapshot. The default is 100%. The smaller the value, the clearer the picture is required; conversely, the greater the degree of blur tolerance. |
|
| Occlusion limit |
Used to limit the occlusion of the snapshot. The default is 100%. Note: The face is covered, that is, the scene in which the person wears a hat or a mask. The smaller the value, the smaller the occluded area of snapshot is required; conversely, the greater the occlusion tolerance. |
|
| Scenarios selection |
Used to select preset or custom scenarios for the terminal, including:'Quick Scenario', 'Safe Scenario' and 'Custom Scenario'. The default is 'Safe Scenario'. | |
| Quick Scenario | The liveness detection is disabled, which is suitable for scenarios with a large amount of traffic, which can effectively improve the speed of traffic. | |
| Safe Scenario | The liveness detection is enabled, which is suitable for scenarios with strict pass verification, which can effectively improve safety. | |
| Custom Scenario | Manually set 'Liveness detection Related Parameters', '1: N Identification Related Parameters' and '1:1 Identification Related Parameters'. | |
Liveness Detection Related Parameters |
Set this group option when 'Scenario selection' is set to 'Custom scenario'. | |
| Liveness detection visible light threshold |
Liveness detection under visible light conditions, if the liveness detection score exceeds the specified threshold, the verification is successful. The larger the value, the stricter the detection. The default is 50%. |
|
| Liveness detection near infrared threshold |
Liveness detection under NIR conditions, if the liveness detection score exceeds the specified threshold, the verification is successful. The larger the value, the stricter the detection. The default is 50%. |
|
| 1:N identification related parameters |
Set this group option when 'Scenario selection' is set to 'Custom scenario'. | |
| Visible light threshold | Face verification is performed under visible light conditions. If the photo comparison score exceeds the specified threshold, the verification is successful. The default is 80%. The default threshold is recommended. | |
Step4 Click on 'OK' to save the settings.
2.3.4.4.2 Add identification threshold library
Step1 On the left side of the FaceCloud, click on 'Device' > 'Configuration Management' to open the 'Configuration Management' page.
Step2 On the 'Configuration Management' page, in the 'Identification Threshold Library List' area, click on 'Add Threshold Library' to open the 'Add Threshold Library' dialog box.
Step3 In the 'Add Threshold Library' dialog box, fill in the threshold library information:
| Option | Description |
|---|---|
| Threshold library name | The name used to set the threshold library. |
| Description | Description information used to add a threshold library. |
Step4 Click on 'OK' to save the settings.
2.3.4.4.3 Edit Identification threshold library
Step1 On the left side of the FaceCloud, click on 'Device' > 'Configuration Management' to open the 'Configuration Management' page.
Step2 In the list of the 'Identification Threshold Library List' area of the 'Configuration Management' page, click on 'Edit' in the 'Action' column to open the 'Edit Identification Threshold Library' dialog box of the specified identification threshold library.
Step3 In the 'Edit identification threshold library' dialog box, fill in the identification threshold library information.
Step4 Click on 'OK' to save the settings.
2.3.4.4.4 Delete identification threshold library
Step1 On the left side of the FaceCloud, click on 'Device' > 'Configuration Management' to open the 'Configuration Management' page.
Step2 In the 'Identification Threshold Library List' area of the 'Configuration Management' page, click on 'Delete' in the 'Action' column to open the Confirm Delete dialog box.
Step3 In the Confirm Delete dialog box, click on 'OK' to delete the specified identification threshold library.
 Note: The identification threshold library cannot be restored after it is deleted. Please be cautious.
2.3.4.4.5 Set identification threshold library parameter
Step1 On the left side of the FaceCloud, click on 'Device' > 'Configuration Management' to open the 'Configuration Management' page.
Step2 On the 'Configuration Management' page, in the list of 'Identification Threshold Library List' area, click on 'Parameter Settings' in the 'Action' column to open the 'Threshold Library Settings' dialog box for the specified identification threshold library.
Step3 In the 'Threshold Library Settings' dialog box, fill in the setting information:
| Option | Description |
|---|---|
| Visible light threshold | Face verification is performed under visible light conditions. If the photo comparison score exceeds the specified threshold, the verification is successful. The default is 80%. The default threshold is recommended. |
| Near infrared threshold | Face verification is performed under near infrared conditions. If the photo comparison score exceeds the specified threshold, the verification is successful. The default is 0%. |
Step4 Click on 'OK' to save the settings.
2.3.4.4.6 Sync device configuration
Step1 On the left side of the FaceCloud, click on 'Device' > 'Configuration Management' to open the 'Configuration Management' page.
Step2 On the 'Configuration Management' page, click on 'Select Device and Sync' to open the 'Select Device and Sync' dialog box.
Step3 In the 'Select and Sync Devices' dialog, search for the specified device. For instructions, see: 2.3.4.1.1 Query device
Step4 In the device list, select the check box in front of 'Device Name'.
Step5 Click on 'OK' to synchronize the 'Identification Threshold Library List' of the FaceCloud to the specified device.
2.3.4.5 Delivery log
The delivery record page is used to query the history of the configuration information sent by the FaceCloud to the terminal, including data, configuration, rules, and applications.
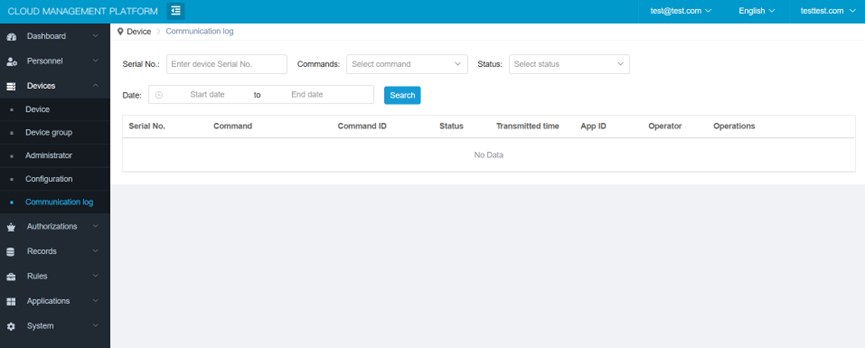
Query delivery record
Step1 On the left side of the FaceCloud, click on 'Device' > 'Delivery record' to open 'Delivery Record' page to query the list of delivery records.
The delivery record information includes: serial number, instruction, instruction ID, status, delivery time, application ID, and operator.
Step2 On the 'Delivery record' page:
1) Enter the 'serial number' and click on 'Search' to query the delivery records of the specified device.
2) Enter the 'command' and click on 'search' to query the delivery records of the specified delivery order.
3) Enter the 'Start Date' and 'End Date' to query the delivery records for the specified time period.
Step3 Search for the specified delivery record, click on 'Details' in the 'Action' column of the delivery record list, and open the 'Delivery record details' dialog box to view the detailed information of the specified delivery record.
Detailed information includes: specified name, instruction ID, serial number, application ID, data download address, processing feedback address, status, operator, delivery time, queuing time, sending time, arrival time, command execution start time, command completion time.
2.3.5 Permission
Authority is used to manage the permission of the FaceCloud based on roles.
2.3.5.1 Role management
On the role management page, log in to the FaceCloud using the super administrator account and manage the role of the platform administrator account according to the actual application scenario.
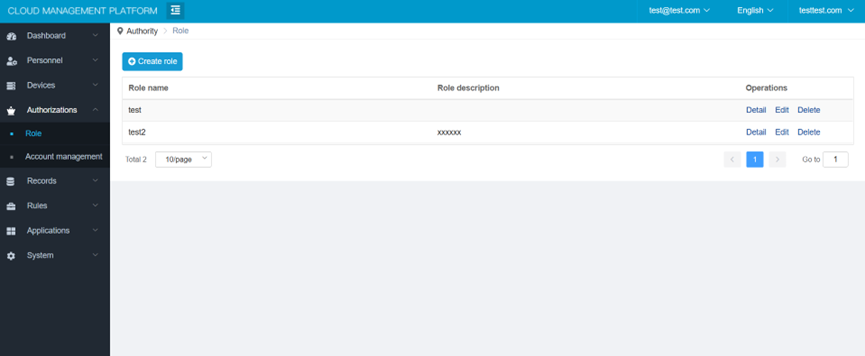
2.3.5.1.1 Query role
Step1 On the left side of the FaceCloud, click on 'Permission' > 'Role Management' to open the 'Role Management page' and query the role list.
The role information includes: role name, role description.
Step2 On the 'Role Management' page, click on 'Details' in the 'Action' column of the role list to open the 'Role Details' dialog for the specified role.
Role details include: role name, role description, platform permissions, data permissions (person data, device data, application data).
2.3.5.1.2 Add role
Step1 In the list on the left side of the FaceCloud, click on 'Permission' > 'Role Management' to open the 'Role Management' page.
Step2 On the 'Role Management' page, click on 'Add Role' to open the 'Add Role' dialog box.
Step3 In the 'Add Role' dialog box, fill in the role information:
| Option | Description |
|---|---|
| Role Name | Used to set the name of the role. |
| Role description | Description information used to add a role. |
| Data permission | Used to set the role's access permission to personnel data, device data, and application data. The personnel data access permission settings are based on the organization that has been set up. For details, see: 2.3.3.2 Organization The device data access permission settings are based on the grouped devices that have been set up. For details, see: 2.3.1.3.2 Device grouping  Note: The new role can select the data permission item configured, which is not greater than the data permission possessed by the current operator. The same platform/application permissions below. Note: The new role can select the data permission item configured, which is not greater than the data permission possessed by the current operator. The same platform/application permissions below. |
| Platform permission | Used to set the role's access permission to the FaceCloud.  Note: The 'Online Authorization' permission under 'Device' can only authorize the device online through the 'Terminal Authorization Assistant'. Note: The 'Online Authorization' permission under 'Device' can only authorize the device online through the 'Terminal Authorization Assistant'. |
| Application authorization | Used to set the management authority of the role. |
Step4 Click on 'OK' to save the settings.
2.3.5.1.3 Edit role
 Note: Operators cannot edit their own roles.
Step1 In the list on the left side of the FaceCloud, click on 'Permission' > 'Role Management' to open the 'Role Management' page.
Step2 On the 'Role Management' page, click on 'Edit' in the 'Action' column of the role list to open the 'Edit Role' dialog for the specified role.
Step3 In the 'Edit Role' dialog box, modify the role information.
Step4 Click on 'OK' to save the settings.
2.3.5.1.4 Delete role
 NOTE:
NOTE:
1) Operators cannot delete their own roles.
2) After the role is deleted, it cannot be restored. Please be cautious.
Step1 In the list on the left side of the FaceCloud, click on 'Permission' > 'Role Management' to open the 'Role Management' page.
Step2 On the 'Role Management' page, click on Delete in the 'Action' column of the role list to open the delete confirm dialog.
Step3 Click on 'OK' to delete the specified role.
 Note:
Note:
1) If there is an account associated with the role, after the role is deleted, the account is retained, but the role-related permissions are canceled.
2) If you log in to an account that is not associated with a role, you will be prompted to log in fail.
2.3.5.2 Account management
On the account management page, log in to the FaceCloud using the existing platform administrator account. Based on the actual application scenario, manage the platform administrator account. The permissions are determined by the associated role.
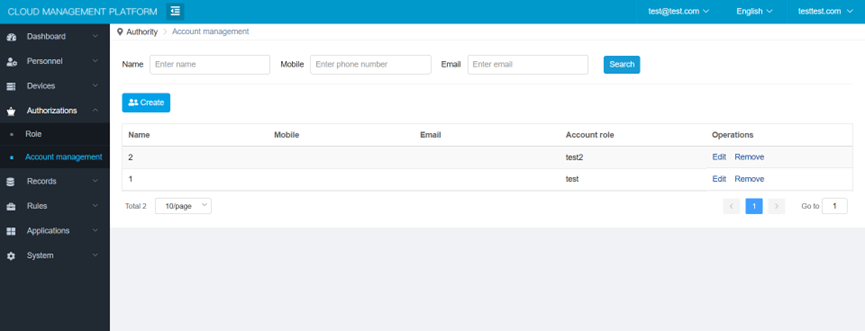
2.3.5.2.1 Query account
Step1 On the left side of the FaceCloud, click on 'Permission' > 'Account Management' to open the 'Account Management' page and query the FaceCloud administrator account list.
The role information includes: account number, role, status.
 Note: The main administrator role is not displayed in the list.
Step2 On the 'Account Management' page:
1) Enter 'Name' and click on 'Search' to query the person with the specified name;
2) Select 'Mobile Number' and click on 'Search' to query the account that matches the specified registered mobile number;
3) Select 'Mailbox' and click on 'Search' to query the account of the specified registered mailbox.
Step3 Click on 'Details' in the 'Action' column of the account list to open the 'Account Details' dialog box for the specified account.
Account details include: account number, user, role, creator, status, person in charge, email, mobile number.
2.3.5.2.2 Add account
Premise: The operator must have personnel management authority; equipment management authority; data, platform, application management authority.
 Note:
Note:
1) The administrator registered with the mobile phone can only add an account for the person with the mobile phone number;
2) The administrator registered in the mailbox can only add an account for the person with the mailbox;
3) Do not add personnel account repeatedly;
4) You cannot add an account for the main administrator.
Step1 In the list on the left side of the FaceCloud, click on 'Permission' > 'Account Management' to open the 'Account Management' page.
Step2 On the 'Account Management' page, click on 'Add Account' to open the 'Add Account' dialog box.
Step3 In the 'Add Account' dialog box, fill in the account information:
| Option | Description |
|---|---|
| Personnel | The account of the cloud platform administrator. Enter the name to query and select the person in the organization. |
| Role | Used to set the role of the account. The role needs to be preset. |
Step4 Click on 'OK' to save the settings.
2.3.5.2.3 Edit account
 Note: The operator cannot edit his account.
Step1 In the list on the left side of the FaceCloud, click on 'Permission' > 'Account Management' to open the 'Account Management' page.
Step2 On the 'Account Management' page, click on 'Edit' in the 'Action' column of the account list to open the 'Edit Account' dialog box for the specified account.
Step3 In the 'Edit Account' dialog box, modify the account information. For details, please refer to: 2.3.5.2.2 Add account
Step4 Click on 'OK' to save the settings.
 Note: The super administrator account cannot be edited.
2.3.5.2.4 Delete account
 NOTE:
NOTE:
Operators cannot delete their own roles.
After the account is deleted, it cannot be restored. Please be cautious.
The primary administrator cannot be deleted.
Step1 In the list on the left side of the FaceCloud, click on 'Permission' > 'Account Management' to open the 'Account Management' page.
Step2 On the 'Account Management' page, click on 'Delete' in the 'Action' column of the role list to open the Delete Confirmation dialog box.
Step3 Click on 'Remove Now' to remove the specified account.
2.3.6 Record
Record management, used to query and manage the identification records uploaded by the terminal.
The identification record page is used to query and manage the identification record uploaded by the terminal to the FaceCloud.
2.3.6.1 Query identification records
Step1 In the list on the left side of the FaceCloud, click on 'Record' > 'Identification record'. By default, the 'Identification Record' page is opened to query the list of identification records uploaded by the device.
The identification record information includes: registration photo, snapshot photo, personnel number, name, organization, identification rule, device group, device name, serial number, identification method, verification result, comparison score, time.
Step2 On the 'Identification record' page
Click on 'More' to display all the filter items; click on 'Collapse' to display the common filter items;
Enter 'name', set 'exact query' or 'fuzzy query', click on 'search', and accurately/fuzzy the identification record of the person who specifies the name;
Enter 'Start date' and 'End date', click on 'search' to query the identification record of the specified time period;
Enter 'Organization' and click on 'Search' to query the identification records of the people belonging to the specified organization.
Enter 'Device name', click on 'search', and fuzzy query the identification record uploaded by the device with the specified name;
Enter 'Serial number' and click on 'Search' to query the identification record uploaded by the device with the specified serial number.
Enter 'Personnel Number' and click on 'Search' to query the identification record of the person with the specified personnel number;
Enter 'Identification Rule' and click on 'Search' to query the identification record of the specified identification rule;
Select 'Verification Result' and click on 'Search' to query the identification record of the specified result.
Select 'Device Group' and click on 'Search' to query the identification record uploaded by the specified device group. The device group needs to be preset. For instructions, see: 2.3.4.2.2 Add device group
Select 'Type of People' and click on 'Search' to query the identification record of the specified result.
Step3 Search and locate the specified identification record, click on 'Details' in the 'Action' column of the identification record list to open the 'Identify Record Details' dialog box for the specified identification record.
2.3.6.2 Export identification records
Step1 In the list on the left side of the FaceCloud, click on 'Record' > 'Identification record', and the 'Identification record' page is opened by default.
On the 'Identification records' page, search for and specify the identification records.
 Note: If no filter condition is set, all identification records are exported by default.
Step2 Click on 'Export' to export the identification record.
 Note: A single operation can support the export of 20,000 identification records.
2.3.6.3 Delete identification record
Step1 In the list on the left side of the FaceCloud, click on 'Record' > 'Identification record', and the 'Identification record' page is opened by default.
Step2 On the 'Identification record' page, search for and locate the specified identification record.
Step3 In the identification record list, click on 'Delete' in the 'Action' column to open the Delete confrim dialog box.
Step4 Click on 'OK' to delete the specified identification record.
 Note: The identification record cannot be restored after it is deleted. Please be cautious.
2.3.6.4 Delete identification record in batches
 Caution: Identification record cannot be recovered after deleted. Please be cautious.
Step1 In the list on the left side of the FaceCloud, click on 'Record' > 'Identification record', and the 'Identification record' page is opened by default.
Step2 On the 'Identification record' page, search for and locate the specified identification record.
Step3 In the identify records list, select one or more check boxes before identifying records.
Step4 Click on 'Batch Delete' to open the Confirm Delete dialog box.
Step5 Click on 'OK' to delete the specified identification record.
2.3.6.5 Query export record history
Step1 In the list on the left side of the FaceCloud, click on 'Record' > 'Identification record' > 'Export Records' to open the 'Export Records' page and view the list of exported records.
Exporting record information includes: exporting file name and exporting account.
Step2 On the 'Export Records' page:
1) Click on 'Download' in the 'Action' column of the list to download the specified identification record export file.
2) Click on 'Delete' in the 'Action' column of the list, open the delete confirm dialog box, click on 'OK', delete the specified identification record export file.
2.3.7 Rule
Rule management is used to set and manage the identification rules, and the identification rules that are bound to the personnel information are delivered to the terminal.
2.3.7.1 Identification rules
The identification rule page is used to set and manage the identification rule, that is, the designated person passes the terminal in a specified identification method in a specified time period.
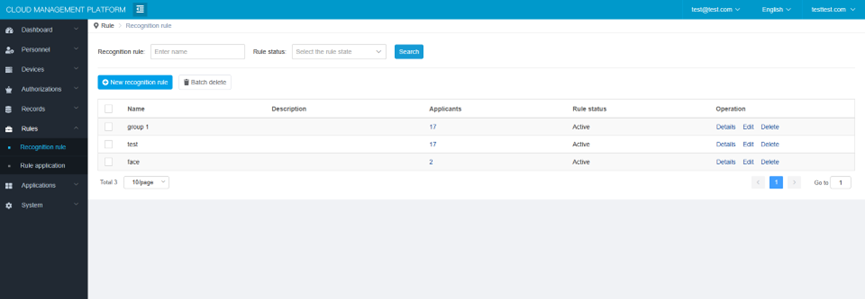
2.3.7.1.1 Query identification rules
Step1 In the list on the left side of the FaceCloud, click on 'Rules' > 'Identification rule' to open the 'Identification rule' page and query the list of identification rules.
The identification rule information includes: rule name, rule description, application number, and rule status.
Step2 On the 'Identification Rules' page
Enter the 'Identification Rule' and click on 'Search' to query the identification rules of the specified name.
Select 'Rule status' and click on 'Search' to query the identification rules of the specified status.
Step3 Search and locate the specified identification rule, click on 'Details' in the 'Action' column of the identification rule list to open the 'Identification Rule Details' dialog box of the specified identification rule.
The identification rule details include: rule name, rule description, identification method, time rule, and associated personnel.
2.3.7.1.2 Add identification rule
Step1 In the list on the left side of the FaceCloud, click on 'Rules' > 'Identification Rules' to open the 'Identification Rules' page.
Step2 On the 'Identification Rules' page, click on 'Add Identification Rule' to open the 'Add Identification Rule' dialog box.
Step3 In the 'Add Identification Rule' dialog box, fill in the identification rule information:
| Option | Description |
|---|---|
| Rule name | The name used to set the identification rule. |
| Rule description | Description information used to add a identification rule. |
| Multiple Validation (Private Cloud) | To create a multi-identification rule, you need to enable the multi-identification function of the device in Device > Device Management > Settings. |
| Card No. (Private Cloud) | After selecting multiple verifications, you need to fill in the unified card number of the verification queue. Decimal or hexadecimal input can be selected. The length and form of the card number depends on the signal input device. |
| Identification method | Used to set the identification method, including 'face', 'face + ID card', 'face + passport', 'face + IC card', 'face + access card', 'face + password' 6 ways.  Note: 1) The 'face' check box is selected by default; 2) When the 'face' check box is selected, the supplementary identification method cannot select 'QR code' and 'face + password'. 3) Password is 4-digit verification password. For details, please refer to: 1.8.1 Add person Note: 1) The 'face' check box is selected by default; 2) When the 'face' check box is selected, the supplementary identification method cannot select 'QR code' and 'face + password'. 3) Password is 4-digit verification password. For details, please refer to: 1.8.1 Add person |
| Time rule | Used to set the time period during which the rule takes effect. See 2.3.7.1.3 Add time rule |
| Associated personnel | The person who be set the rules. See 2.3.7.1.4 Add people to rules |
Step4 Click on 'OK' to save the settings.
2.3.7.1.3 Add time rule
Precondition: 2.3.7.1.2 Add identification rule
Step1 In the 'Add Identification Rule' dialog box, click on 'Time Rule' to open the 'Add Time Rule' page.
Step2 On the 'Add Time Rule' page, fill in the time rule information:
| Option | Description |
|---|---|
| Name | The name used to set the time rule. |
| Date | Used to set the effective time period of the time rule. |
| Week | Used to set the effective weekly policy of the time rule. |
| Time | Used to set the effective daily policy of the time rule. |
| Identification method | Used to set allow/deny pass within the time rule. |
Step3 Click on 'OK' to save the settings.
2.3.7.1.4 Add people to rules
Precondition: 2.3.7.1.2 Add identification rule
Step1 In the 'Add Identification Rule' dialog:
1) Set 'Associate Person' to 'Deliver by Person' to display the personnel selection box.
Person needs to be preset. For instructions, see: 01.6.1 Add person
2) Set 'Associate Person' to 'Deliver by Organization' to display the organization selection box.
Organization needs to be preset. For instructions, see: 2.3.3.2.2 Add Group
Step2 In the 'All People/Organizations' list, search for and target the specified person/organization.
Step3 Select the check box in front of the person/organization name and click on the arrow to add the specified person/organization to the 'Selected Persons/Organizations' list.
Step4 Click on 'OK' to save the settings.
 Note: After deliver by organization the identification rules, if the organization subsequently adds new person, the new person also follow the organization's identification rules.
2.3.7.1.5 Edit identification rule
Step1 In the list on the left side of the FaceCloud, click on 'Rules' > 'Identification Rules' to open the 'Identification Rules' page.
Step2 On the 'Identification rule' page, search for and locate the specified identification rule.
Step3 On the identification rule list, click on 'Edit' in the 'Action' column to open the 'Edit identification rule' dialog box for the specified identification rule.
Step4 In the 'Edit Identification Rule' dialog box, modify the identification rule information. For details, see: 2.3.7.1.2 Add identification rule
Step5 Click on 'OK' to save the settings.
2.3.7.1.6 Delete identification rule
Step1 In the list on the left side of the FaceCloud, click on 'Rules' > 'Identification Rules' to open the 'Identification Rules' page.
Step2 On the 'Identification rule' page, search for and locate the specified identification rule.
Step3 In the list of identification rules, click on 'Delete' in the 'Action' column to open the Confirm Delete dialog box.
Step4 Click on 'Delete' to delete the specified identification rule.
2.3.7.1.7 Delete identification rules in batches
Step1 In the list on the left side of the FaceCloud, click on 'Rules' > 'Identification Rules' to open the 'Identification Rules' page.
Step2 On the 'Identification rule' page, search for and locate the specified identification rule.
Step3 In the Identification rule list, select one or more check boxes in front of the rules.
Step4 Click on 'Batch Delete' to open the Confirm Delete dialog box.
Step5 Click on 'Delete' to delete one or more of the specified identification rules.
2.3.7.2 Delivery Rules
The rule delivery page is used to deliver the set identification rule to the specified terminal.
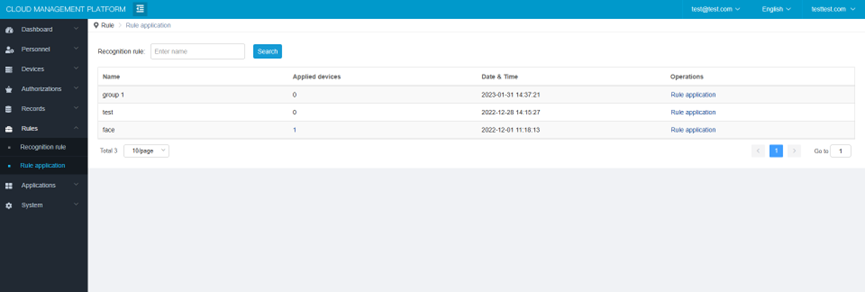
Delivery identification rule
Step1 On the left side of the FaceCloud, click on 'Rules' > 'Rules Delivery' to open the 'Rule Delivery' page.
Step2 On the 'Rule Delivery' page, search for and locate the specified identification rule.
Step3 In the identification rule list, click on 'Rules Delivery' in the 'Action' column to open the 'Rules Delivery' dialog box.
Step4 In the 'All Devices' list of the 'Rules Delivery' dialog box, search for and locate the specified device and select one or more check boxes.
Step5 Click on the arrow to add one or more devices to the 'Selected Devices' list.
Step6 Click on 'OK' to deliver the identification rules and related personnel to the specified device.
The identification rules need to be preset. For details, see: 2.3.7.1.2 Add identification rule
2.3.8 Application
Used to manage application authorization.
The application authorization page is used to authorize secondary development, which allows third-party developers to create applications based on the platform, interoperate with the data of the platform, and expand the business.

2.3.8.1 Query application
Step1 In the list on the left side of the FaceCloud, click on 'Application' > 'Application Authorization' to open the 'Application Authorization' page and query the application list.
Application information includes: app name, app ID, secureKey, pushKey, creation time, and status.
Step2 On the 'Application Authorization' page:
1) Enter the 'app name' and click on 'Search' to fuzzy query the application with the specified name;
2) Enter 'app ID' and click on 'Search' to query the application with the specified ID.
Step3 Specify query criteria to search for and target the specified app.
Step4 In the apps list, click on 'Details' in the 'Action' column to open the 'Details' page for the specified app.
2.3.8.2 Create an application
Step1 On the left side of the FaceCloud, click on 'Application' > 'Application authorization' to open the 'Application authorization' page.
Step2 On the 'Application authorization' page, click on Create app ID to open the 'Create App ID' page.
Step3 On the 'Create App ID' page, fill in the app information:
| Option | Description |
|---|---|
| Application ID | The ID used to set the app to be uniquely identified. There are 2 ways to set this option: 1) Click on 'Generate' to automatically generate the app ID; 2) Enter a string to customize the app ID. |
| Application Name | Used to set the name of the app. |
| Put into dashboard | Used to set whether to put it into dashboard. When this option is set to Yes, the app is displayed in the Basic Apps area of Dashboard > Home page. |
| Jump address | Used to set the access address of the app. If 'Place into dashboard' is set to 'Yes', you need to specify 'Jump Address'. |
| Key | Used to set appKey When the third-party application invokes the FaceCloud interface, the token is obtained through appId and appKey. This option can be selected by automatically generated and customized in two settings. |
| Push_key | The key used to set the push service. The third-party application receives the information pushed by the FaceCloud through the appId and the Push_key. This option can be selected by automatically generated and customized in two settings. |
| Push address | Used to set the push address and push the information specifying the 'push event type' to this address. If you set ' Push_key ', you need to specify ' Push Address '. |
| Push event type | The type of event used to set the push. For specific event type descriptions: 2.3.8.1.3 Event description |
Step4 Click on 'Test' to verify that 'Jump Address' or 'Push Address' is available.
Step5 Click on 'OK' to save the settings.
2.3.8.3 Event description
| Grouping | Event | Description |
|---|---|---|
| Identification record event | New identification record | Personnel pass through the terminal for verification, and new identification records are generated. |
| Personnel event | New personnel | Generated when a passer is added through a terminal or cloud management platform. |
| Update personnel | Generated when a passer is updated through a terminal or cloud management platform. | |
| Delete personnel | Generated when a passer is deleted through a terminal or cloud management platform. | |
| Rule event |
New rule | Generated when a new pass rule is added through the terminal or cloud management platform. |
| Update rule | Generated when a pass rule is updated through a terminal or a cloud management platform. | |
| Delete rule | Generated when a pass rule is deleted through a terminal or a cloud management platform. | |
| Device event |
Device activation | Generated when the terminal is successfully activated. |
| Device connected | Generated when the terminal connected the network. | |
| Device disconnected | Generated when the terminal disconnected the network. | |
| Device restored to factory settings | Generated when the terminal restored to the factory settings through the terminal or cloud management platform. | |
| Alarm event | Temperature is too high | Generated when the temperature of the terminal exceeds 90 degrees Celsius. |
| Camera broken | Generated when the camera of the terminal fails. | |
| Storage warning | Generated when the available storage space of the terminal is less than 15%. | |
| Equipment was removed | Generated when the wall-mounted type terminal with the "device removal warning" turned on is removed. | |
| Device information update | Generated when the terminal name is changed. | |
| Speed gate alarm | Generated when the terminal recognizes that the person is trailing, or that the person is reversed when it passes. | |
| Permission event | appAuth.enums.events.ORGANIZATION_ADD | Generated when adding organizations through the cloud management platform. |
| appAuth.enums.events.ORGANIZATION_UPDATE | Generated when the organization is changed through the cloud management platform. | |
| appAuth.enums.events.ORGANIZATION_DELETE | Generated when the organization is deleted through the cloud management platform. |
2.3.8.4 Edit application
Step1 On the left side of the FaceCloud, click on 'Application' > 'Application authorization' to open the 'Application authorization' page.
Step2 On the 'Application authorization' page, search for and target the specified app.
Step3 In the app list, click on 'Edit' in the 'Action' column to open the 'Edit Application' dialog box for the specified app.
Step4 In the 'Edit Application' dialog box, modify the app information. For details, see: 2.3.8.1.2 Create an application
Step5 Click on 'OK' to save the settings.
2.3.8.5 Disable apps
Step1 On the left side of the FaceCloud, click on 'Application' > 'Application authorization' to open the 'Application authorization' page.
Step2 On the 'Application authorization' page, search for and target the specified app.
Step3 In the app list, click on 'Disable/Enable' in the 'Action' column to disable/enable the specified app.
 Note:
Note:
Apps with disabled status cannot be accessed.
If you disable the 'Put ito Dashboard' setting, the app will be deactivated on the 'Dashboard' > 'Home page'.
2.3.8.6 Delete application
 Caution: After the app is deleted, it cannot be recovered. Please be cautious.
Step1 On the left side of the FaceCloud, click on 'Application' > 'Application authorization' to open the 'Application authorization' page.
Step2 On the 'Application authorization' page, search for and target the specified app.
Step3 In the app list, click on 'Delete' in the 'Action' column to open the Confirm Delete dialog box.
Step4 In the Confirm Delete dialog box, click on 'Delete' to delete the specified app.
2.3.8.7 Get token
Step1 On the left side of the FaceCloud, click on 'Application' > 'Application authorization' to open the 'Application authorization' page.
Step2 On the 'Application authorization' page, search for and target the specified app.
Step3 In the app list, click on 'token' in the 'Action' column to open the 'Generate token' dialog box, displaying the automatically generated token, and its effective date.
Note: The token is valid for 30 minutes and can be manually refreshed after it expires.
Step4 In the 'Generate token' dialog:
1) Click on 'Refresh' to refresh the token.
2) Click on 'Copy' to copy the token.
2.3.9 System management
The setting page is used for operation and maintenance of the system, including archive identification record,personnel account,change admin, and alarm notification.
2.3.9.1 Back-up
Back up page for downloading system logs.

Archive identification record
Step1 Click on 'New Archive' to open the 'New Archive Task' dialog box.
Step2 In the 'New Archive Task' dialog box, set the 'Start Time' and 'End Time'.
'Archive Data', 'Archive Data Estimated Space', and 'Disk Residual Estimated Space' show the amount of data associated with the specified archive time.
 Note: Archive up to 20,000 data in a single operation.
Step3 Click on 'OK' to archive the identification records for the specified archive time.
Step4 Go back to the 'System Archive' page and query the archive task in the archive list:
1) Click on 'Download' in the 'Action' column to download the archive file;
2) Click on 'Delete' in the 'Action' column to delete the archive file.
 Caution: The archived identification record will be automatically deleted after 7 days.
2.3.9.2 Personnel Account(Public Cloud)
The personnel account page, used to query the current account registration type, is divided into mobile phone number registration and mailbox registration; set whether to automatically send registration invitations.
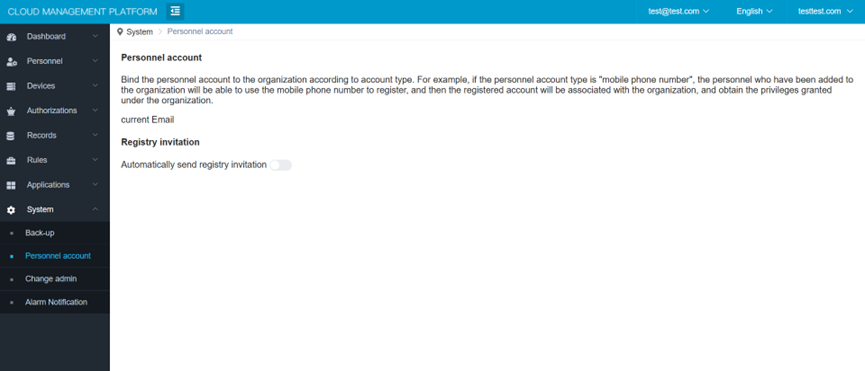
Step1 In the list on the left side of the FaceCloud, click on 'Settings' > 'Account' to open the 'Account' page.
Step2 On the 'Personal Account' page, click on the 'Automatically send registration invitation' switch to turn sending on or off.
2.3.9.3 Change Admin
Replace the main administrator page to change the registration information of the main administrator.
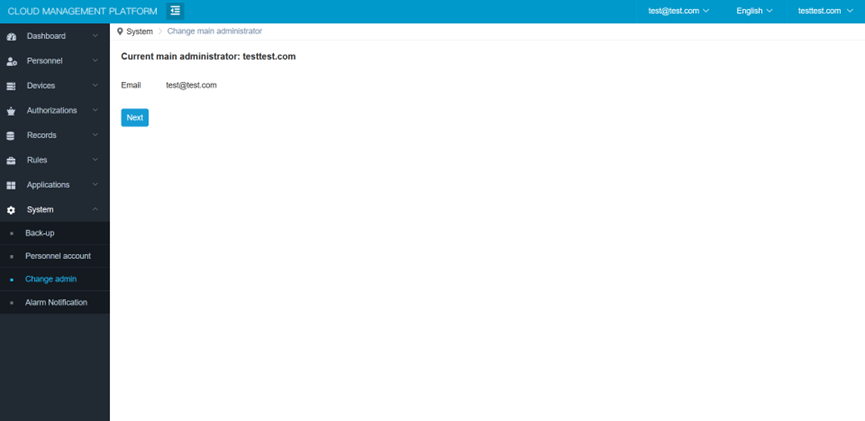
Step1 In the list on the left side of the FaceCloud, click on 'Settings' > 'Change Primary Administrator' to open the page.
Step2 On the replacement page:
1) Click on 'Get Verification Code' to verify the main administrator account; after successful verification, click on 'Next' to enter the main administrator settings page.
2) Enter a name to search for and select a person under the organization.
3) Click on 'Get Verification Code' to get the verification code.
4) Enter the received verification code to verify the new account.
Click on 'OK to replace' to complete the replacement of the main administrator.
2.3.9.4 Alarm Notification
Log in the email to receive the alarm on the alarm notification page, when an alarm occurs, the system will send the alarm information to the registered email.
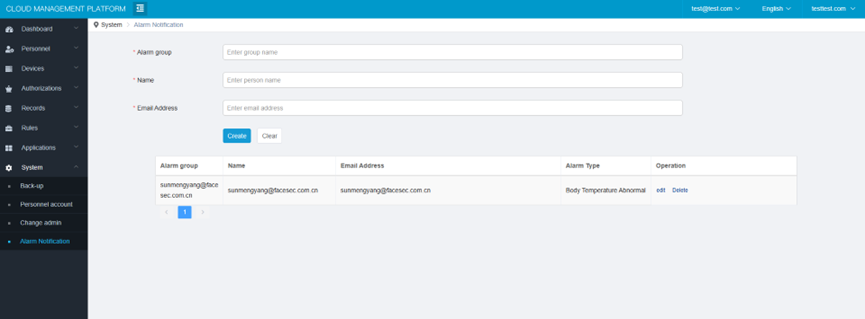
 ▲ Currently, only temperature alarms are supported.
3. System Expansion
The FaceCloud can enable third-party developers/ISVs to quickly complete their own business development. By calling the open API of the FaceCloud, third-party platform applications can flexibly and easily use the core layer functions of the FaceCloud such as member modification, rule customization, and data distribution, allowing the terminal and customer application systems to be better integrated.
Through API connection, the following functions can be achieved: tenant information acquisition, personnel addition, deletion and modification checking (and synchronization to face devices), personnel belonging organization addition, deletion and modification checking, device information acquisition, rule management, identification record acquisition, photo cropping, and face More than 1 function.
3.1 FaceCloud WebAPI
The FaceCloud can enable third-party developers/ISVs to quickly complete their own business development. By calling the open API of the FaceCloud, third-party platform applications can flexibly and easily use the core layer functions of the FaceCloud such as member modification, rule customization, and data distribution, allowing the terminal and customer application systems to be better integrated.
Through API connection, the following functions can be achieved: tenant information acquisition, personnel addition, deletion and modification checking (and synchronization to face devices), personnel belonging organization addition, deletion and modification checking, device information acquisition, rule management, identification record acquisition, photo cropping, and face More than 1 function.
3.2 Overview of data push from FaceCloud

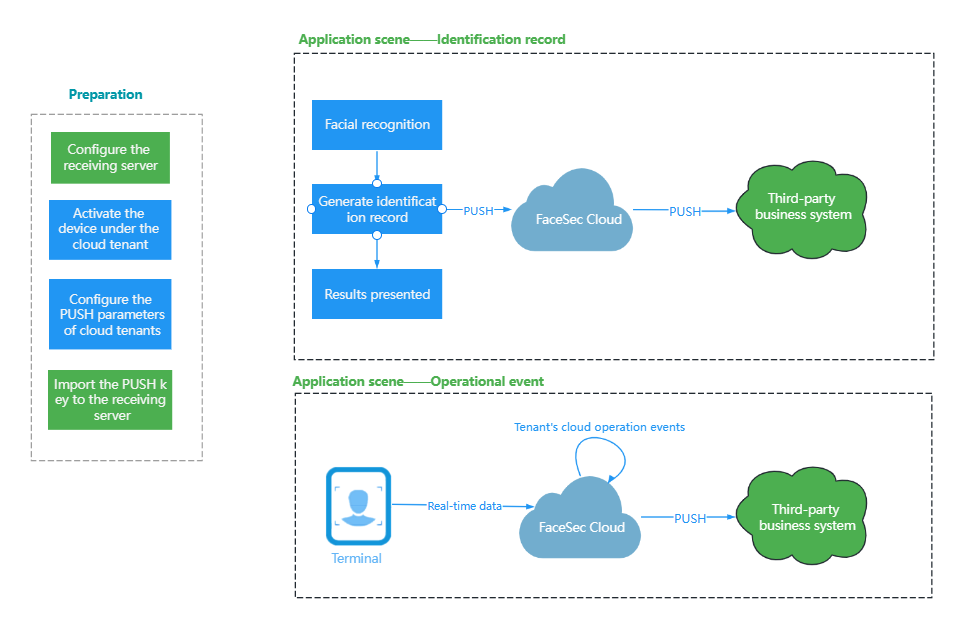
4. FAQ
4.1 The terminal cannot connect to the FaceCloud.
Confirm the network environment.
Check whether ports 80, 443, 123, and 6666 of the firewall are enabled.
4.2 Can multiple people log in at the same time with one cloud account?
The specifications rule is impossible. For security design, only one person is allowed to log in at the same time with the same login account.
If there is an operational requirement for multiple people to log in to the FaceCloud at the same time, please create a sub-administrator by yourself.
4.3 After the activation code is updated, can the old activation code still be used?
No. After the activation code is updated, the old activation code will become invalid immediately and will not affect the activated terminals.
